
This post is the first post to a multi-post series ‘Demystifying Proxmox VE’ capturing & documenting my learnings & experiences as I tinker with this incredible open-source virtualization platform – Proxmox VE.
What Is Proxmox VE — and Why Everyone’s Talking about It
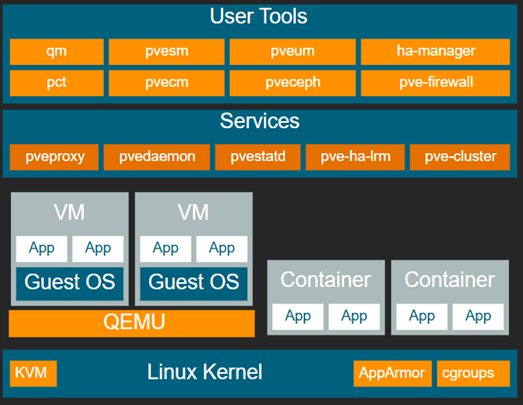
Proxmox Virtual Environment (Proxmox VE) is a powerful, open-source virtualization platform that combines KVM (Kernel-based Virtual Machine) and LXC (Linux Containers) into one integrated management stack. Out of the box, it also provides software-defined storage (ZFS, Ceph, LVM), built-in backups, and high-availability clustering — all accessible through a modern web interface or CLI.
Think of it as a complete data-center-in-a-box that runs equally well on enterprise servers and DIY homelab gear. We can spin up Windows and Linux VMs, create lightweight containers, manage networks and firewalls, replicate storage, and even orchestrate full clusters — all without licensing fees.
Who Uses Proxmox (and Why)
Homelab Enthusiasts & IT Learners
Proxmox has become a staple in the homelab community. Its combination of:
- A full-featured web GUI
- Integrated storage and backups
- Easy clustering
Small & Medium Businesses
For SMBs that can’t justify the cost or complexity of VMware vSphere, Proxmox offers enterprise-grade features without enterprise-grade licensing. Backup scheduling, live migration, and high availability all come standard. There’s even a paid support subscription for teams that need commercial assurance.
Enterprises Seeking Cost-Control or Independence
Enterprises with mixed workloads or open-source strategies increasingly view Proxmox as a way to break away from vendor lock-in. With open APIs, REST endpoints, and full transparency, Proxmox fits well into hybrid or edge deployments — especially those driven by Linux or Kubernetes.
Why Proxmox’s Popularity Is Exploding (Post-VMware Acquisition)
When Broadcom acquired VMware in 2023, licensing models shifted dramatically:
- Higher costs for perpetual licenses and renewals,
- Discontinued products (like vSphere Essentials and free ESXi),
- Restrictive subscriptions requiring minimum bundles.
This left many IT pros searching for an affordable alternative. This opened up the doors for alternatives like Proxmox, Nutanix AHV, XCP-ng, Microsoft Hyper-V, etc.
DIY’ers & homelab enthusiasts have already been using Proxmox for tinkering (due to it being open-source & free). This helped build a robust & incredibly collaborative community. The Broadcom-VMWare development brought it to the forefront & made it one of the strongest contenders.
Overnight, thousands of organizations — from universities to managed service providers — started evaluating or migrating to Proxmox VE. Its open-source nature means:
- No licensing audits,
- No feature gating,
- And long-term stability independent of corporate mergers.
For many, Proxmox became the natural evolution path from VMware ESXi, especially for labs, edge servers, and SMB data centers.
What Else They Offer
Beyond its flagship Proxmox Virtual Environment (VE) hypervisor, the Proxmox team offers a tightly integrated suite of open-source infrastructure tools that complement each other seamlessly.
- Proxmox Backup Server (PBS) provides enterprise-grade, deduplicated backups for VMs, containers, and physical hosts with incremental snapshots and strong data integrity verification—perfect for both homelabs and production environments.
- Proxmox Mail Gateway (PMG) acts as a full-featured email security solution, filtering spam, malware, and phishing before messages reach your internal mail servers.
Download Link
One can download the ISO files for the offerings here – https://www.proxmox.com/en/downloads
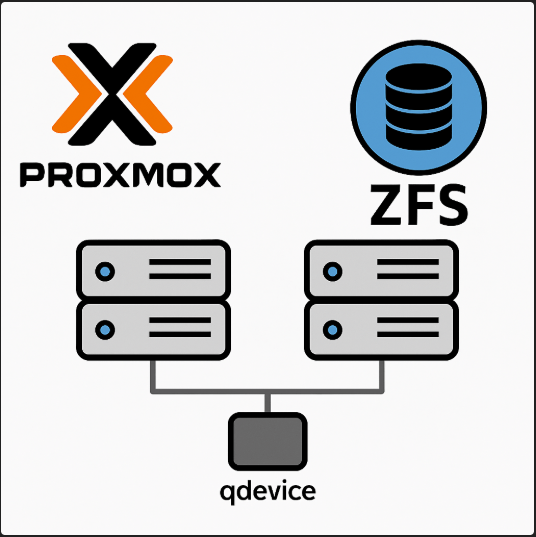
Core Components
Proxmox VE comprises of a few key software components that make clustering, synchronization, and high availability (HA) possible.
Below are the major building blocks of a Proxmox VE cluster — what they do, and how they fit together.
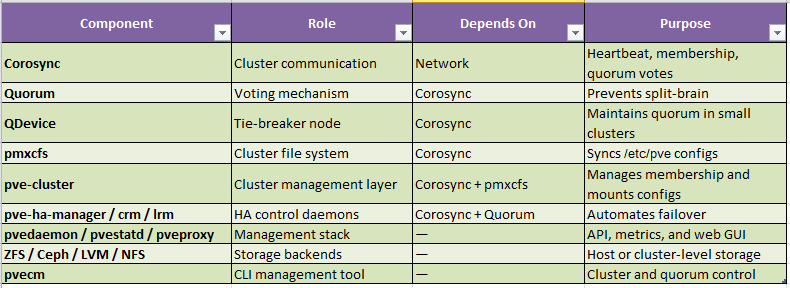
Corosync
Corosync is the cluster communication engine used by Proxmox VE.
It provides the messaging layer that allows all nodes in a cluster to exchange heartbeat signals, membership data, and quorum votes.
In short, Corosync is the heartbeat of the Proxmox cluster — if it fails, the cluster loses coordination.
Quorum
Quorum is the rule that determines whether the cluster is allowed to make changes.
It ensures that a majority of nodes agree on the current state before performing any actions like starting or migrating VMs.
This inbuilt mechanism prevents “split-brain” — where two isolated groups of nodes both think they’re the primary cluster.
Avoids data corruption by ensuring only one majority partition stays active.
Basic Formula
Quorum = (Number of Nodes / 2) + 1
Example:
3 nodes → quorum = 2
5 nodes → quorum = 3
If the number of online nodes drops below quorum, the cluster goes into read-only mode (no VM starts, migrations, or HA actions).
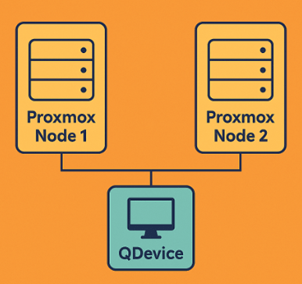
You might ask – “He just started with a 3-node cluster. What happens when we are dealing with a 2-node cluster?“
Enter ‘QDevice’.
QDevice
A QDevice is a tie-breaker node that helps small clusters (usually 2-node setups) maintain quorum.
It participates only in quorum voting — it doesn’t run VMs or hold storage.
Example:
In a 2-node cluster, both nodes must be online to keep quorum. If one goes down, the other loses quorum and stops making changes.
Adding a QDevice gives you a third vote, so the cluster can maintain quorum with one node offline.
Common choices for QDevice:
- A lightweight VM on another host
- A Raspberry Pi
Basically, this can be any small Linux box running the ‘corosync-qdevice’ service
pmxcfs (Proxmox Cluster File System)
pmxcfs is a distributed, in-memory file system built on SQLite and synchronized over Corosync.
It stores all cluster-wide configuration files — things like VM definitions, storage configuration, HA groups, and user permissions.
Key Points
- Lives under /etc/pve/
- Automatically synchronized across all nodes in the cluster
- Read-only when quorum is lost (to prevent config corruption)
Pve-cluster
The pve-cluster package ties Corosync and pmxcfs together.
It’s the service layer that initializes cluster membership, mounts pmxcfs, and handles node joins and departures.
It does things like:
- Mount /etc/pve/ as a shared configuration directory
- Manage node identity and cluster keys
- Provide the backend for cluster commands (pvecm)
pve-ha-manager / pve-ha-crm / pve-ha-lrm
These are the High Availability (HA) management daemons.
They monitor nodes and automatically move or restart VMs and containers when failures occur.
- Pve-ha-manager – Top-level service controlling HA policy.
- Pve-ha-crm (Cluster Resource Manager) – Decides where to place resources
- Pve-ha-lrm (Local Resource Manager) – Executes start/stop commands on each node
They depend on Corosync and Quorum being healthy. Without quorum, HA actions are suspended.
pvedaemon, pvestatd, and pveproxy
These services form the management and monitoring layer:
- pvedaemon handles API and task execution.
- pvestatd collects stats (CPU, memory, disk, etc.) from all nodes.
- pveproxy runs the web GUI and REST API interface.
They’re not cluster-critical but provide the control and visibility for administrators.
Storage Stack (ZFS, Ceph, LVM, NFS)
While not cluster daemons, storage backends integrate tightly with the cluster configuration.
- ZFS — local storage with built-in RAID and replication
- LVM/LVM-thin — fast block storage on local or SAN disks
- Ceph — distributed, cluster-wide storage with redundancy
- NFS/iSCSI — external shared storage for HA
Storage definitions live inside /etc/pve/storage.cfg, which pmxcfs replicates to all nodes.
pvecm (Proxmox VE Cluster Manager)
pvecm is the command-line tool used to manage cluster membership and quorum state.
Some frequently used commands are as follows –
- pvecm create – Create new cluster
- pvecm add <IP> – Join another node
- pvecm nodes – List all nodes
- pvecm status – Show quorum and ring status
Proxmox Architecture
Build#1 – 2-node cluster with Mirrored Local Storage with ZFS & Replication
Since I am using nested virtualization for this test, this is how I will be setting up the environment –
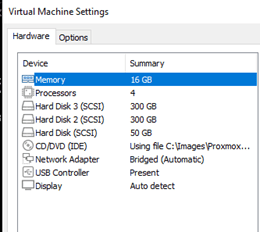
- Host 1 –
- VM Name – pxmx01
- FQDN – pxmx01.minerva.lan (ease of accessing outside of lab environment)
- IP Address – 10.0.26.3/25
- Disks – 3 (Total – 650GB)
- Disk 0 (Boot Disk) – 50GB
- Disk 1 (ZFS Mirror Member#1) – 300GB
- Disk 2 (ZFS Mirror Member#2) – 300GB
- RAM – 16GB
- vCPU – 4
- Host 2 –
- VM Name – pxmx02
- FQDN – pxmx02.minerva.lan (ease of accessing outside of lab environment)
- IP Address – 10.0.26.4/25
- Disks – 3 (Total – 650GB)
- Disk 0 (Boot Disk) – 50GB
- Disk 1 (ZFS Mirror Member#1) – 300GB
- Disk 2 (ZFS Mirror Member#2) – 300GB
- RAM – 16GB
- vCPU – 4
- VM Name – pxmx02
Let’s get rolling!
I created the nodes in my environment according to the specs above.
Now, let’s fire them up and install Proxmox.
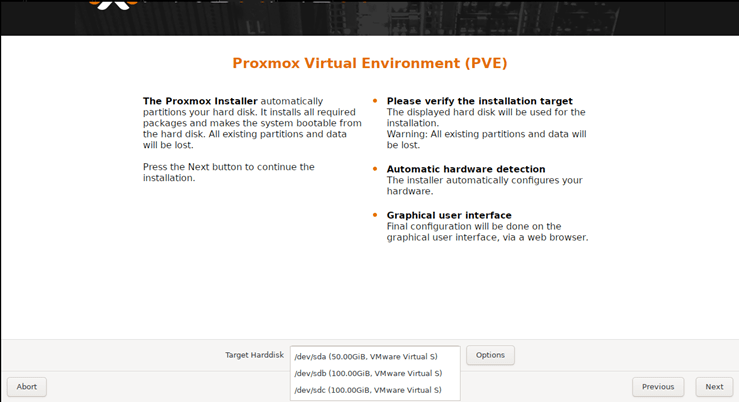
I will be selecting the 50GB as my boot drive.
Fill-in the locale & set a secure root password.
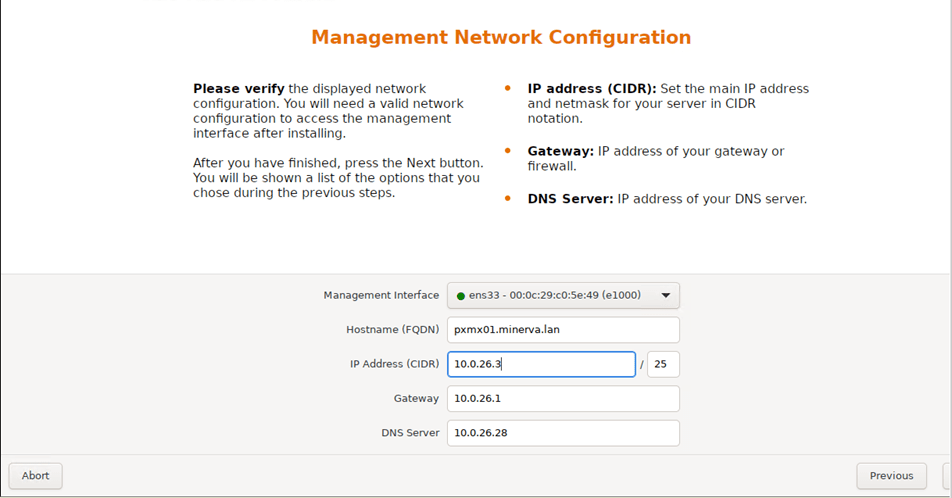
I am assigning the static IP Address per my plan here.
Confirm the submitted settings in the ‘Summary’ page and press ‘Install’ to kick off the installation process.

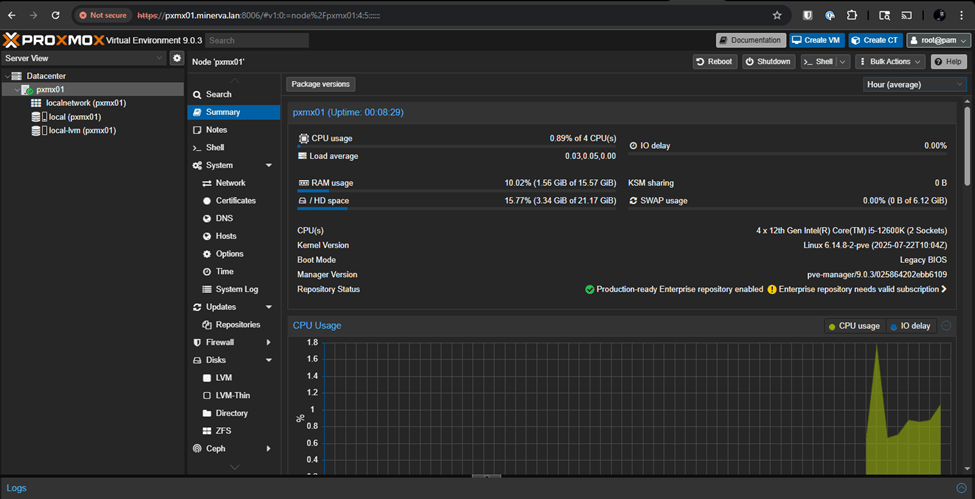
Once installation is completed for both nodes, let’s access the GUI of both nodes.
https://pxmx01.minerva.lan:8006
https://pxmx02.minerva.lan:8006

Now that boot disks are installed with Proxmox and accessible with FQDNs, let’s setup our mirrored pools.
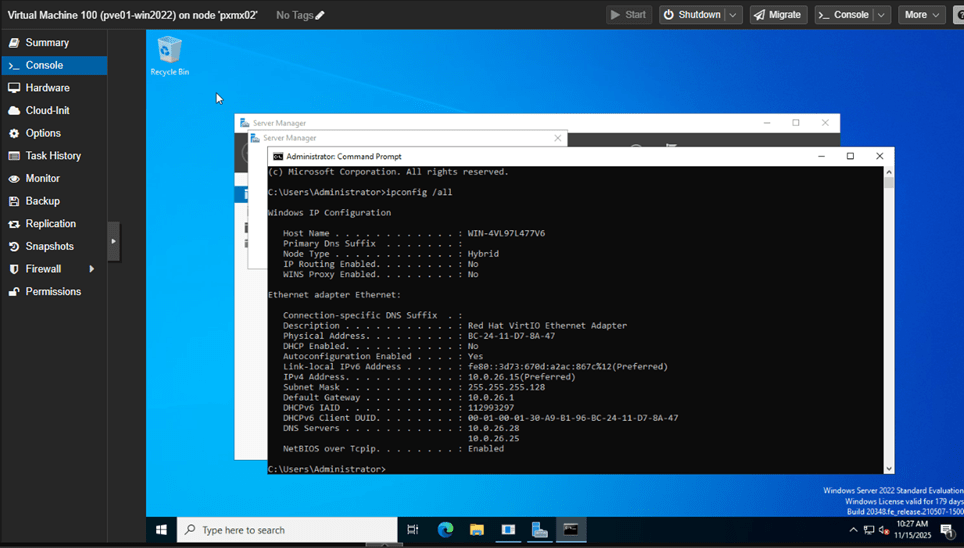
Let’s check the disk names and their metadata by running the command
lsblk -o NAME,SIZE,MODEL,MOUNTPOINT
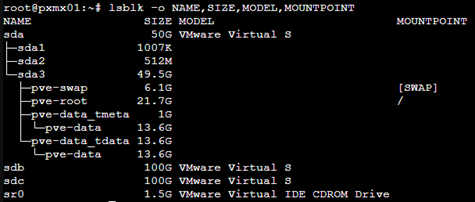
- sda is my boot/OS drive (mounted at /).
- sdb and sdc are unused and show no mountpoint which means they are safe for ZFS.
Now on each node, let’s run the following commands to create the mirrored pool –
zpool create -f vmdata mirror /dev/sdb /dev/sdc
zfs set compression=zstd vmdata
Then, we will add the mirrored pool to Proxmox.
pvesm add zfspool vmdata –pool vmdata –content images,rootdir

Once completed, we should be able to see a mirrored disk ‘vmdata’ on the left navigation pane.

Note – For ZFS to work, the pool name must match on both nodes.
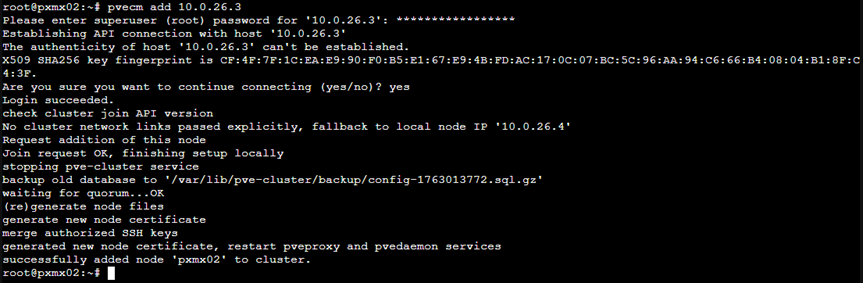
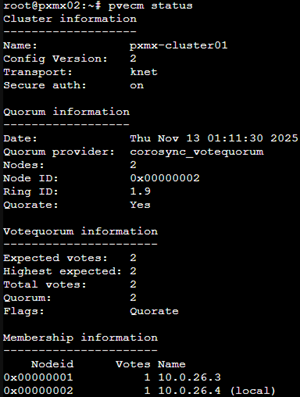
Now, let’s create a cluster by running the following command –
In my environment, I will be naming the cluster – pxmx-cluster01 and I would like to initiate the cluster from pxmx01.
Pvecm create pxmx-cluster01

To add pxmx02 to the same cluster, let’s execute the command
Pvecm add 10.0.26.3
So now, regardless of any node we access, it will show the same two nodes – pxmx01 & pxmx02.
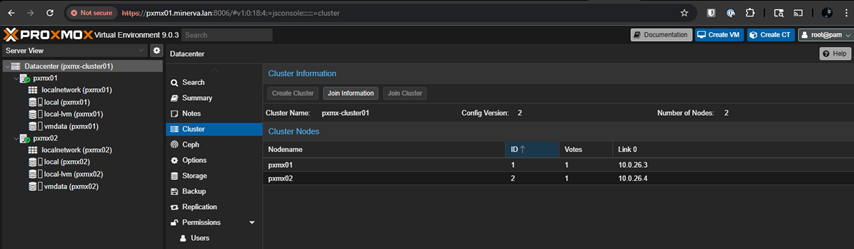
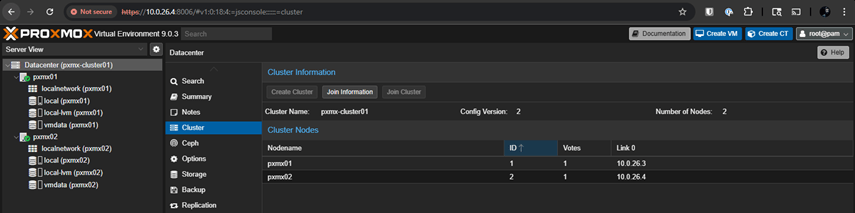
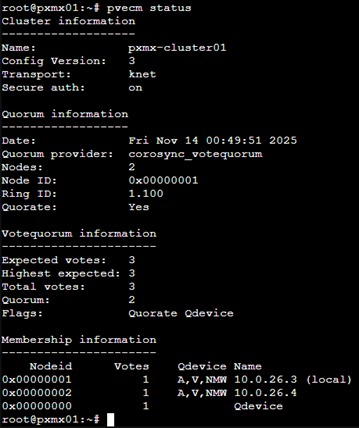
Cluster Quorum Status

Our ZFS pool is looking good and healthy as well.

Now, let’s create and configure the QDevice.
This is what Proxmox’s Official Documentation says
“Using a QDevice allows two-node clusters to maintain quorum by adding a third vote on an external host running the qnetd daemon.”
“This host can be a small low-powered machine or VM running Debian.”
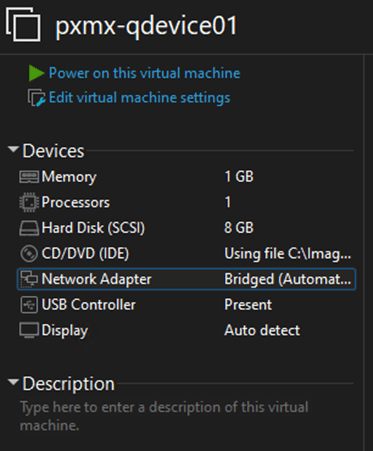
As this can be a tiny device or VM running a stable version of Debian, I will be creating a small VM in my host environment with the following specs –
- VM Name – pxmx-qdevice01
- FQDN – Not required
- IP Address – 10.0.26.5/25
- Disks – 1 (Total – 8GB)
- RAM – 1GB
Proxmox also recommends a stable version of Debian. At the time of writing this article, Debian 13.1 (Trixie) is the stable version. So, I will choose that for my QDevice.
Download link – https://cdimage.debian.org/debian-cd/current/amd64/iso-cd/
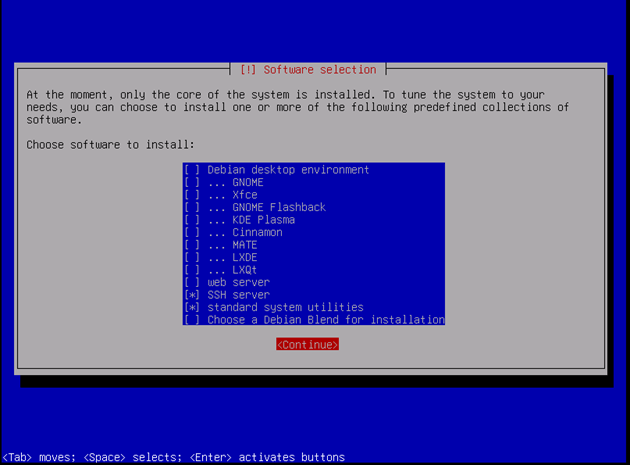
Let it Rip!

For this small machine, we will just need
- SSH Server
- Standard System Utilities
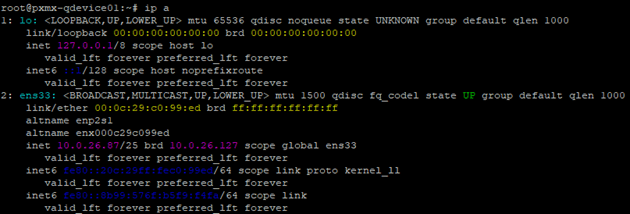
Once installation is complete, let’s login to the console of the VM to fetch the IP Address. So, let’s find out the target IP through the VM console.

Let’s SSH to the IP address (10.0.26.87)

Let’s get into the root permissions by typing ‘su –‘
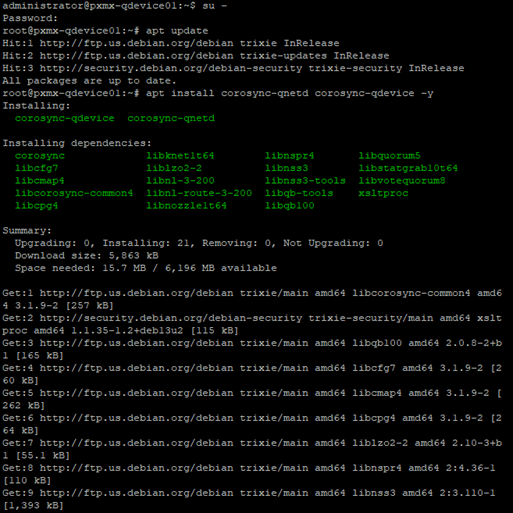
And run apt update to update the packages.
Once updated, let’s install corosync packages to set this VM as a qdevice.
Let’s check the status of the qdevice to ensure the corosync services are up and running or not.
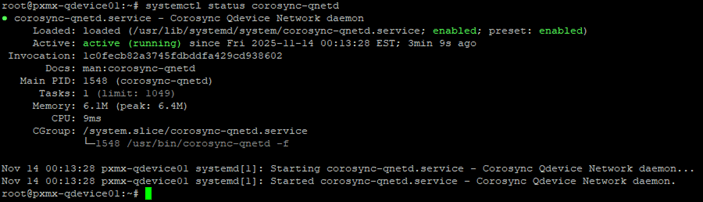
We are in business!
Now, let’s update the IP Address of the qdevice in our hosts. We can choose any any one node for this (as both nodes are in cluster).
The root password for the qdevice is showing as wrong.
Researching this online, I found that the shown errors might be a bit misleading to many.
This exact error happens when Debian’s root SSH login is disabled by default, even though the root user exists.
So the password is correct — SSH is simply refusing to let root log in.
This is normal for Debian 12/13. We just need to enable root SSH login temporarily.
Let’s change the SSH config inside our qdevice.
nano /etc/ssh/sshd_config
Uncomment the following line –
#PermitRootLogin prohibit-password
Replace ‘prohibit-password’ to ‘yes’.
Once changed, save the file and exit.
OK, I am able to login but it looks like the system is not able to generate certs.

bash: line 1: corosync-qdevice-net-certutil: command not found
Researching online for a bit, found that this binary lives in the corosync-qdevice package on the Proxmox nodes, not on the QDevice VM. So pvecm qdevice setup can’t generate the certificates.
Let’s install them on both nodes.
apt update
apt install corosync-qdevice –y
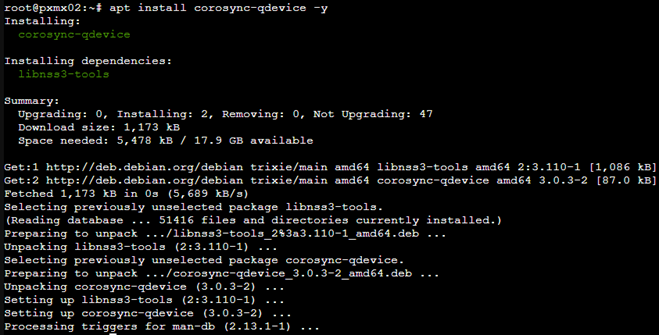
We are set!
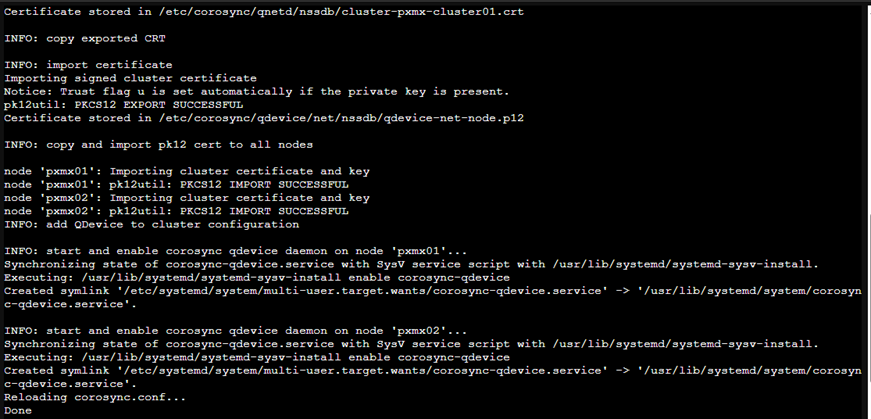
Post this, I was able to add the QDevice successfully to the two Proxmox nodes and once added, the quorum vote count went to 3.
I also want to ensure that the QDevice doesn’t lose its IP as this will be catastrophic for the cluster during node failure scenarios. So, I will set the IP Address (10.0.26.87) as persistent.
Let’s get into the NIC settings in our QDevice –
nano /etc/systemd/network/10-ens33.network
Update the file with this –
[Match]
Name=<vNIC Name>
[Network]
Address=<Static IP Address>/<CIDR>
Gateway=<Default Gateway of the network>
DNS=<DNS Server IP Address>
Then save & exit.
Now, let’s disable DHCP for the ens33 interface –
rm -f /etc/systemd/network/*dhcp*.network
Let’s restart the network services for the changes to take effect –
systemctl restart systemd-networkd
Let’s verify if it retained our desired IP Address post restart –
It did.
Let’s check the cluster status as well.
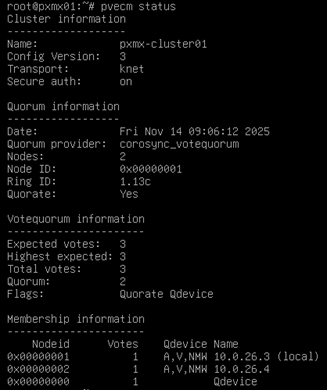
And the QDevice connectivity is still intact. Love it!
ZFS & Replication Setup
Now that our cluster is setup, let’s configure ZFS & Replication
What we know so far –
- Nodes: pxmx01 and pxmx02
- Each node has one ZFS mirror pool on Disk1+2
- ZFS Pool name: vmdata
- Goal: replicate VMs from pxmx01 → pxmx02
So here is what I am planning to do with my setup –
- I will have a Windows 2022 test VM running on pxmx01 (VM100)
- VM100 will be stored in VM dataset – vmdata/vmstore on each node.
- VM100 replicates to pxmx02 on 15-min intervals.
- Test manual failover of VM100 from pxmx01→pxmx02.
- Test manual failback of VM100 from pxmx02→pxmx01.
You might ask –
“when I already have a ZFS pool (vmdata), why do I need another pool for ZFS dataset.”
Short answer – ‘No, you don’t mandatorily need it’
But it is one of best practices recommended by Proxmox. And there are valid reasons behind it –
- Snapshot cleanliness – If you store VMs directly in vmdata, ZFS snapshots will apply to everything in the root.
- Replication targeting is easier – Proxmox replication jobs send datasets. If you replicate from the pool root, ZFS may replicate more than expected, include unneeded datasets.
- Changing compression or properties per dataset.
- Easy separation of roles – vmdata/vmstore for VMs, vmdata/iso for ISOs, etc.
This exercise with validate our 2-node build with controlled DR scenarios.
Let’s create the VM Dataset on both nodes
zfs create vmdata/vmstore

Now, let’s add ZFS storage pool in Proxmox.
In the web UI:
Go to Datacenter → Storage → Add → ZFS
Fill:
- ID: vmstore
- ZFS Pool: vmdata/vmstore
- Nodes: pxmx01, pxmx02
- Content: check Disk image and Container
Click Add
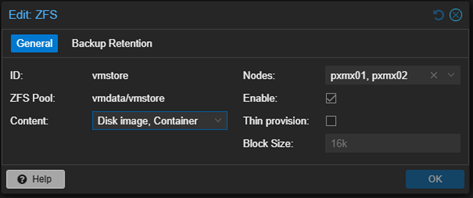
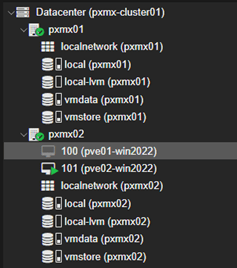
Now both nodes have local ZFS storage defined.

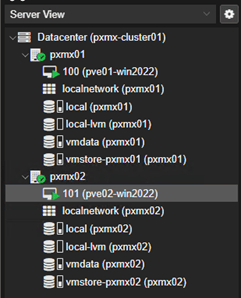
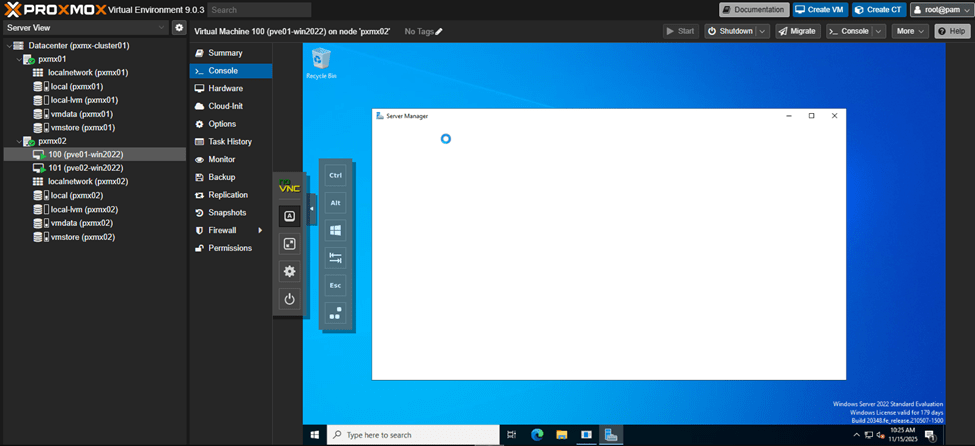
For our testing, I went ahead and spun up the two test VMs – VM100 in pxmx01 & VM101 in pxmx02.
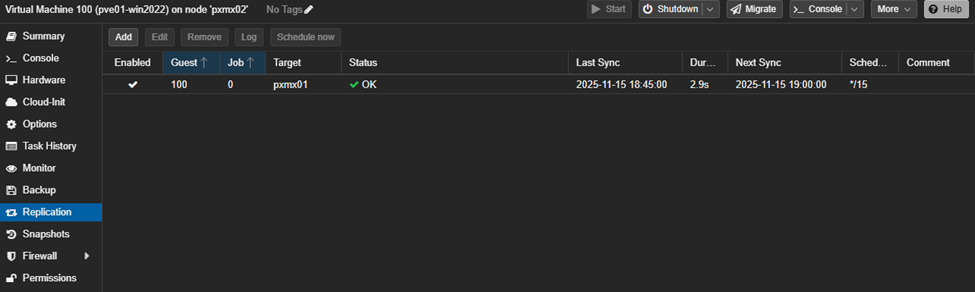
Set Up Primary Replication (VM100 → pxmx02)
Navigate to Datacenter→pxmx01→VM100→Replication→Add a new Replication Job
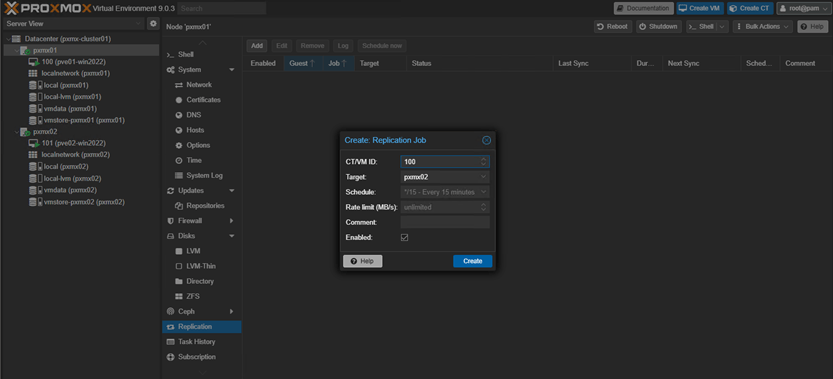
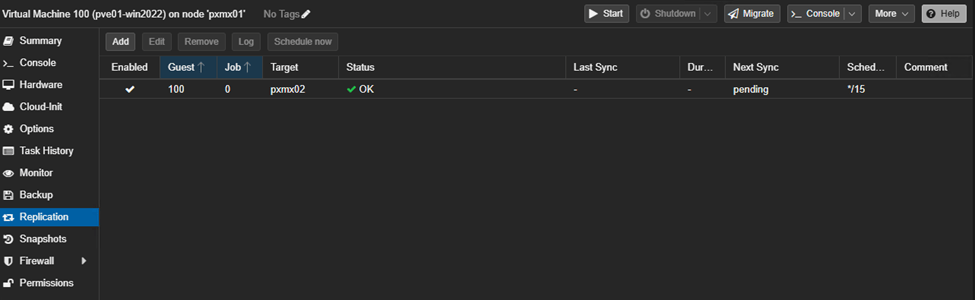
Post 15min, we should be able to see a successful replication job for both machines.
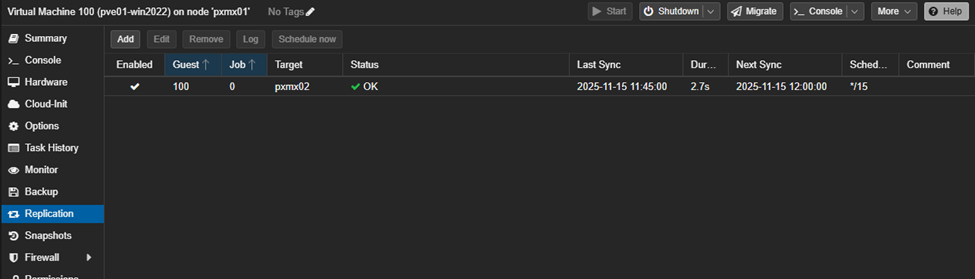
We can also cross-replicate VMs the other way (if we want). So, I added a replication job for VM101 to be replicated from pxmx02→pxmx01.

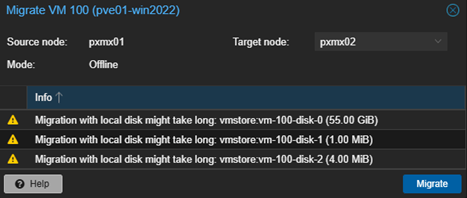
Failover testing (VM100)
Since we are not in an actual disaster and both nodes are healthy, the safest way to “test failover” for VM100 is to do an offline migration of the VM from pxmx01 to pxmx02.
Because we are using ZFS storage replication, Proxmox will:
- Reuse the already-replicated disks on pxmx02, and
- Automatically flip the replication direction afterward (now from pxmx02 → pxmx01).
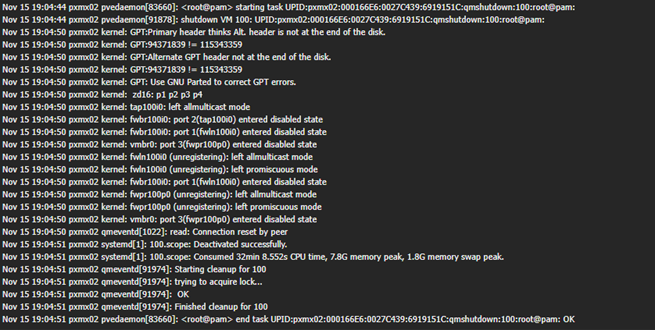
Step 1 – Shut down the VM100 from GUI

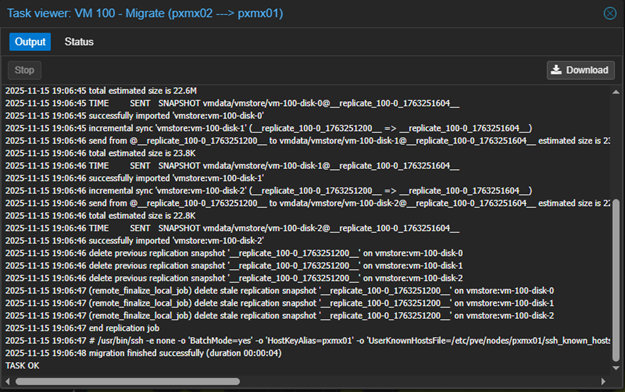
Step 2 – Highlighting VM100, click ‘Migrate’ on upper right.
We can check the status of the job by clicking the job on the list and click on ‘Logs‘.
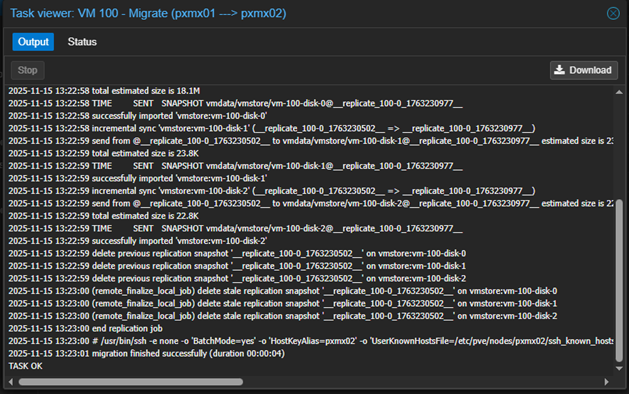
The VM has migrated successfully.
Step 3 – Power on VM100 on host pxmx02
The IP settings were retained during migration.
The replication job (associated with the VM) also got migrated and this is exactly what we want.
Failback Testing for VM100
Step 1 – Shutdown VM100 that now running in pxmx02.
Step 2 – Migrate VM100 to pxmx01.

VM100 is back in pxmx01 again.

Step 3 – Start VM100 that now running in pxmx01
And, we are back. Though this is a very lightweight test machine, the failover and failback times are incredibly fast.

This is the most amount of automation we can achieve with this setup.
My current environment uses:
- Local ZFS storage on each node (vmstore dataset on each host)
- ZFS replication → not shared storage
- Nested virtualization through VMware Workstation
- Two-node Proxmox cluster with QDevice quorum
With this architecture, here’s the hard truth:
‘Proxmox cannot do automatic HA failover without shared storage.’
ZFS replication is asynchronous, not shared.
Each node has its own copy of the VM disks, but they are not the same dataset.
This means:
- HA auto-restart cannot occur because disks are not instantly shared.
- I had to manually Stop → Migrate → start the VM.
- Maximum automation = scheduled replication + offline migration failover.
This is the limit of what ZFS replication with this kind of setup.
What We Would Need for True Automatic HA
To get real HA (VM auto-start on another node when one fails), you need shared, detached, cluster-visible storage, for example:
- NFS Server (simple, low-cost lab HA)
- Central NFS server hosts VM disks
- Both Proxmox nodes mount the NFS share
- Storage becomes shared
- HA can automatically restart VMs
- Ceph (enterprise-grade, fully distributed, true HA)
- Shared block storage (RBD)
- Immediate disk access from any node
- Automatic VM recovery
- Live migration
- Fault tolerance and replication built into Ceph
This is the real HA stack used in production Proxmox clusters.
RPO & RTO with ZFS
ZFS replication provides low-RPO and surprisingly fast RTO when tuned properly.
Minute-level RPO is achievable using frequent incremental sends, and RTO is minimized when using dedicated multiGig links (better if aggregated) for replication traffic.
While this remains a manual failover process, aggressive replication and clean network design allow ZFS to function as a lightweight, low-latency DR mechanism even without shared storage thereby making it a very promising contender for storage mechanism used with Proxmox VE.
Stay tuned for future posts on this topic as I fiddle with other variations & builds.

Leave a comment