

A while back, I wrote a post about setting up my first Pi-hole — mainly for privacy reasons.
Like most people, I’d started noticing that ads seemed to follow me everywhere — from my phone to the TV to every browser tab I opened.
I wanted a way to block trackers and ads at the network level, not just in each device or browser.
That single Pi-hole setup worked beautifully.
It made browsing cleaner and faster across every device in the house, and for a while, I thought I was done.
Then I started reading about Unbound, a lightweight recursive DNS resolver that could make my setup even more private by cutting out public resolvers altogether.
The idea was simple: instead of sending every DNS query to Google (8.8.8.8) or Cloudflare (1.1.1.1) — companies that can log and analyze where your devices connect — Unbound would resolve everything locally, starting from the root DNS servers.
That’s when it really hit me:
Even though I was blocking ads, I was still giving Google or Cloudflare a detailed map of my network’s activity — every site we visited, every app phoning home, every smart device checking in.
Over time, that kind of metadata says a lot about your household:
- When the smart TVs power on
- Which devices are online at certain hours
- What services your family uses most frequently
So, I added Unbound and finally achieved full DNS independence. It felt like the perfect setup — private, fast, and completely mine.
What is Unbound?
Unbound is a recursive DNS resolver — meaning it doesn’t just ask another DNS server (like Google or Cloudflare) for answers; it finds the answer itself by starting at the very top of the DNS hierarchy.
How It Works (Step by Step)
When a device on your network tries to reach a website — say http://www.example.com — Unbound resolves it through this chain:
- Root Servers: It starts at the root (the global “.com”, “.net”, “.org”, etc. authorities).
- Top-Level Domain (TLD) Servers: It then asks the .com TLD servers who handles example.com.
- Authoritative Server: Finally, it asks the actual DNS server that owns example.com for the IP address.
- Caching: It stores the result locally, so the next time anyone in your network visits the same site, it’s lightning fast.
This entire process happens securely and privately — right inside your home network.
While thinking about implementing Unbound, another realization struck me:
If the single Pi-hole ever went down, my entire network would lose DNS.
And in my house, that’s a full-scale emergency — streaming stops, YouTube Kids gone and within minutes my wife and kids are convinced I’ve “broken the Wi-Fi again.” 😅
That’s what pushed me to take the next step — creating a dual Pi-hole setup, both running Unbound.
Then came the next question:
“Okay, I have redundant Pi-holes performing recursive lookups to the public root servers… but how will they stay in sync?”
I didn’t want to manually update adlists, whitelists, or local DNS entries on the second one every time I changed something on the first.
So I did a little digging — and that’s when I discovered Orbital-Sync.
What Is Orbital-Sync?
Orbital-Sync is a lightweight, open-source Python tool that keeps multiple Pi-hole instances synchronized automatically. It’s especially useful in setups where you run two or more Pi-holes for redundancy or load-balancing — so both servers always share the same:
- Adlists (blocklists)
- Whitelists / Blacklists
- Regex filters
- Local DNS records
- CNAME entries
- DHCP settings (if enabled)
Instead of manually exporting/importing configuration files or re-adding domains every time, Orbital-Sync does it for you.
The project is open-source on GitHub:https://github.com/mattwebbio/orbital-sync
Architecture
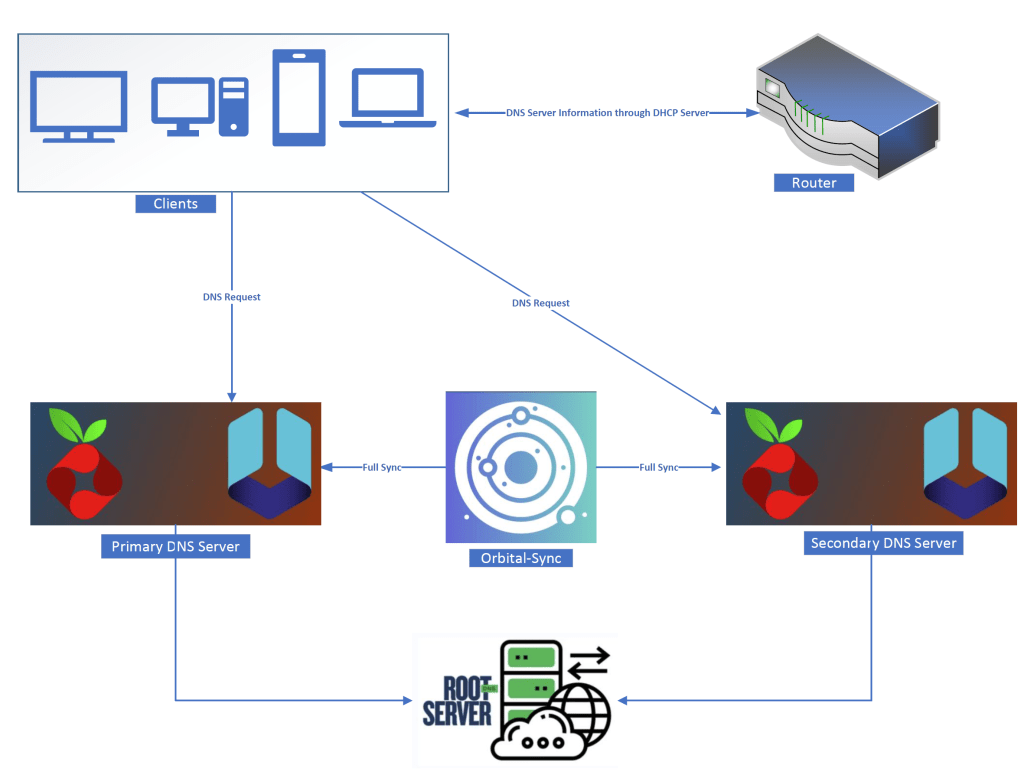
Let’s get to it!
Plan
I will spin-up two PiHole+Unbound docker container stacks on two of my hosts (I will be using two of Raspberry Pi hosts that I have been using in my home network for other containerized workloads).
From there, I will spin-up a single instance of orbital-sync to sync these two instances.
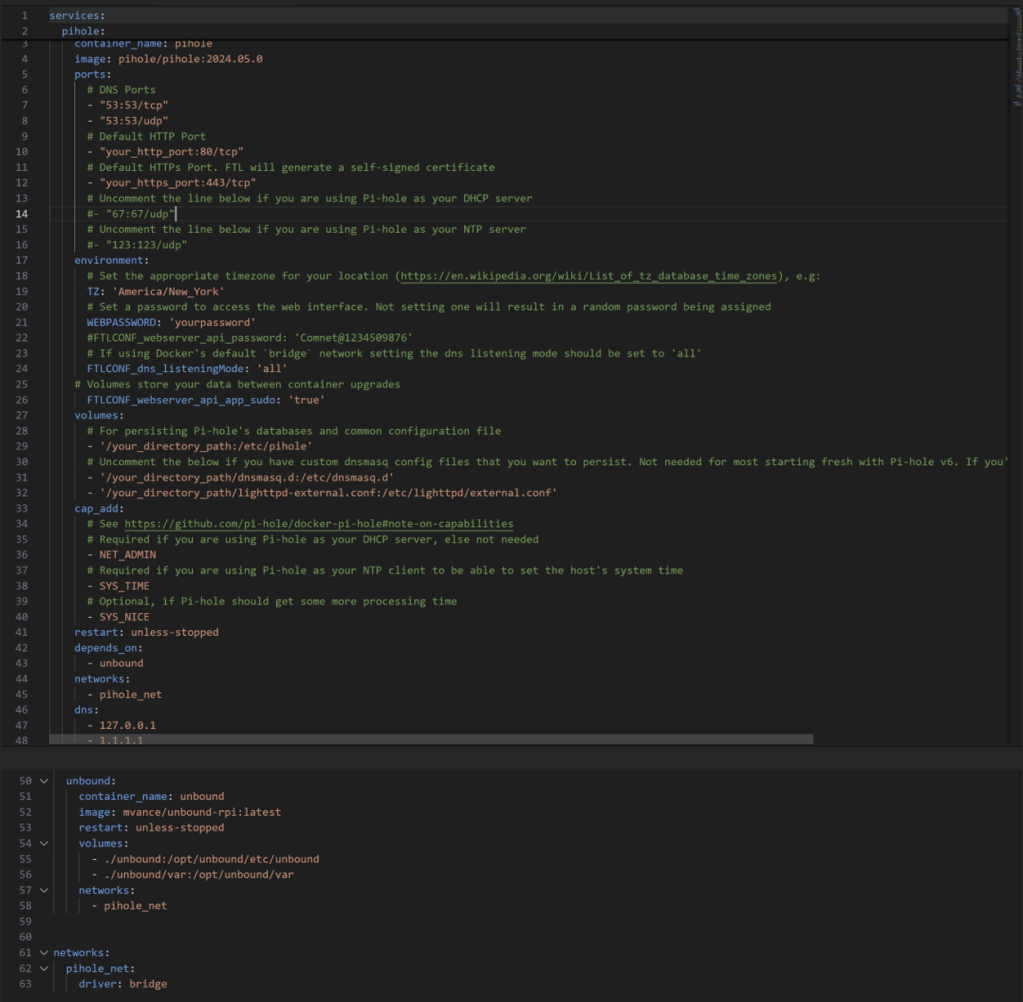
Composing the Symphony
I used the official docker-compose build as my framework.
You can find it here – https://github.com/pi-hole/docker-pi-hole
Couple of things to note here…
You might ask, “Why Pi-hole v5 and not the newest v6?”
Well, I actually did try v6 — and on paper, it should’ve been perfect. It introduces a brand-new web interface, built-in web server, and a modern REST API that replaces the old PHP-based one.
But when I paired it with Nebula-Sync (the sync tool prescribed for v6), things didn’t go as smoothly as expected. After a few sync runs, the second Pi-hole would occasionally hang or become unresponsive. I wasn’t alone, either — looking through the Nebula-Sync GitHub issues, I found others running into the same problems.
In issue #69, users reported that their replica stopped working after a Nebula-Sync run, and in issue #113, there were discussions about missing configurations not syncing correctly with the new API structure.
It turns out that Pi-hole v6’s completely reworked backend broke compatibility with many older sync tools — Nebula-Sync included. The new REST API still has gaps in documentation and coverage, and until it matures, I decided to stick with the proven v5 build where Orbital-Sync works reliably, and syncs are flawless.
Other important items to note –
depends_on:
This tells Docker Compose to start the Unbound container before the Pi-hole container.
That way, when Pi-hole boots up, the Unbound resolver it depends on is already running.
(It doesn’t wait for Unbound to be fully ready—just started—but for most cases this is enough.)
networks:
Both containers are attached to a shared network called pihole_net.
That’s how Pi-hole can resolve the hostname unbound directly instead of relying on external DNS.
It’s a private bridge network that isolates DNS traffic within the stack for security and clarity.
dns:
Inside the Pi-hole service, this line defines the DNS servers used by the container itself, not by the clients:
- 127.0.0.1 → means “use the Unbound resolver running locally in the same stack.”
- 1.1.1.1 → is a fallback (Cloudflare) in case Unbound is down or restarting.
This ensures Pi-hole always has at least one functional resolver, keeping DNS service available.
unbound: block
This defines the Unbound container itself:
- Uses the mvance/unbound-rpi image, which is optimized for Raspberry Pi and ARM boards.
- Mounts configuration files and cache directories from your local folder (./unbound/) so they persist between reboots.
- Uses the same pihole_net network to communicate directly with Pi-hole.
- Automatically restarts unless manually stopped.
Repeat the same install procedure for the 2nd host.
Now, we need to let the PiHole instances know “hey use the local Unbound for DNS lookups”.
Tying it together
Find the internal IPs of the Unbound containers. You can go to Network category of your Portainer if you have installed. If not, install a Portainer container today. You will thank me later (https://allabout802.com/2023/04/02/installing-portainer/)
Update the ‘Custom 1 (IPv4)’ field to the ‘IP Address#53’ of the respective Unbound instances.
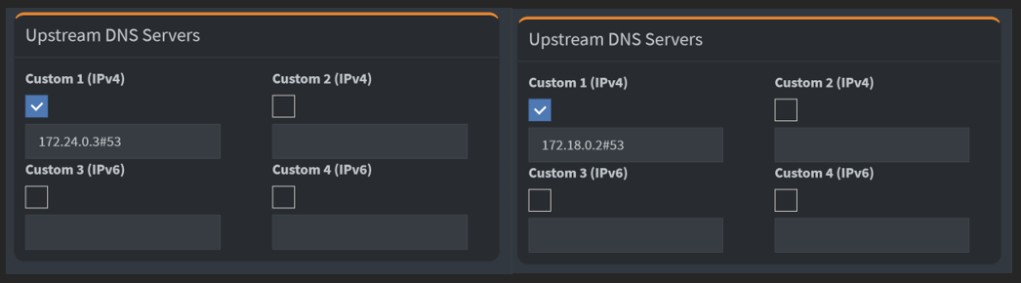
We are in business!
So, we now have two PiHole instances running with Unbound performing recursive lookup to public root servers.
We are almost there….
Sync-up
Let’s spin-up an Orbital-sync container now.
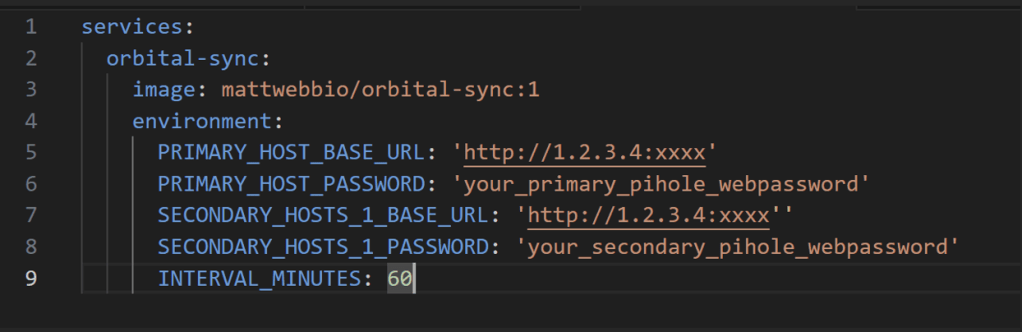
Note – Replace your hosts IPs & web passwords in the file.
I am keeping the sync interval at 60 minutes.
Once the container is spun up, let’s look at the container logs to see if the sync is working as expected.
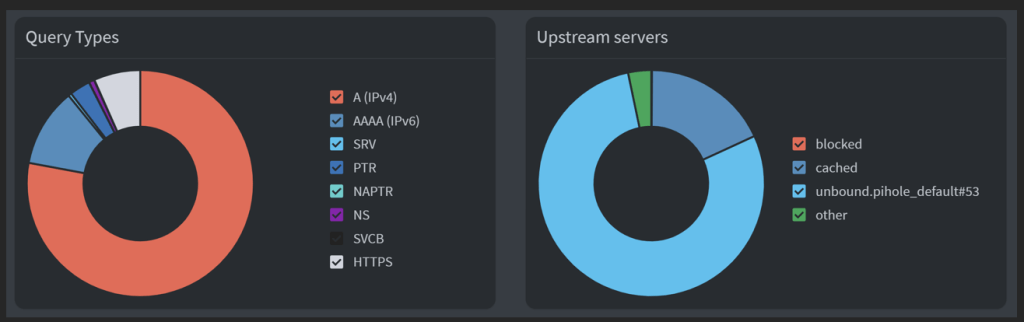
Voila! Sync is working as expected.

We are in business, baby!
As you can see, this dual Pihole+Unbound with sync is working as expected. We now have a fully redundant, secure adguard & DNS setup.
I highly encourage you to try this out in your network and see the magic unfold.

Leave a comment