
It’s been a remarkable decade with my trusty old laptop – a machine that has weathered countless software upgrades, late-night coding sessions, and even a few accidental coffee spills. But as I embarked on the exciting journey of building a homelab, it became evident that my faithful companion, though robust in its time, was no longer cutting it.
When I first got my hands on this powerhouse a decade ago, it was the epitome of speed and reliability. However, with the growing demands of virtualization, testing environments, and all things homelab-related, my old-timer started showing signs of fatigue.
The need for more RAM, processing power, and storage became increasingly apparent. It was like trying to fit a marathon runner’s shoes on a sprinter – a bit cramped and not quite up to the task.
So, with a tinge of nostalgia and a lot of excitement for what lies ahead, I’ve decided to bid farewell to my loyal companion and embark on a quest for a new homelab workhorse. The world of technology has evolved significantly over the past decade, and it’s time for me to embrace the next chapter of my homelab journey with a machine that’s ready to tackle the challenges of today and tomorrow.
This post is to take you all in this journey of mine as I explore the latest hardware options, weigh the pros and cons, and ultimately make the leap into a new era of homelab experimentation. Here’s to the memories of my trusty laptop and the anticipation of what the future holds in the ever-evolving realm of technology.
Building My Homelab: Choosing the Right Foundation
Embarking on the journey of building a homelab was both thrilling and challenging. My goals were crystal clear – I needed a compact PC (preferably Small Form Factor, SFF) that could meet the demands of my homelab requirements and also serve as a reliable platform for hosting local services. As I stood at the crossroads, I had two distinct paths to tread – opt for a pre-built PC or venture into the realm of kits and build my own.
The pre-built options, though convenient, posed a dilemma. Either they fell short in terms of resources, failing to align with my vision, or they came with a hefty price tag. Thus, I found myself inclined towards the prospect of building my own system from scratch. The ‘Kit’ route seemed like the perfect avenue.
After delving into some research on available kits, two contenders stood out in the crowd, each with its own merits – Intel NUC kits and ASRock barebone units. Intel NUCs had long been a favorite, but to my dismay, they were discontinued as of August 2023. Enter Asus, who took over the NUC business, and I can only hope they carry forward the legacy of this remarkable product line.
With Intel NUCs out of the equation, my gaze turned towards ASRock. Known for their quality and versatility, ASRock barebone units emerged as the sole option in my homelab-building adventure. The decision was made, and I was ready to dive into the world of ASRock, eager to see how these kits would shape up my homelab dreams.
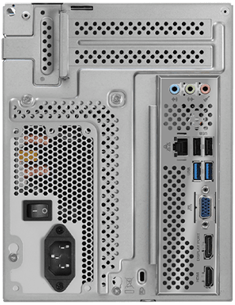
Unveiling the Powerhouse: Technical Features of ASRock B660 Barebone Kit
When it comes to building a homelab, every tech enthusiast seeks a platform that seamlessly blends power, versatility, and reliability. The ASRock B660 Barebone Kit stands out as a compelling choice, offering an array of technical features that elevate the homelab-building experience. Let’s delve into the key specifications that make the ASRock B660 a powerhouse in its class:
Processor Support:
The ASRock B660 supports the latest Intel processors, providing a wide range of options to cater to diverse computing needs. Whether you’re aiming for high-performance tasks or energy-efficient operation, the B660 has you covered.
Memory Compatibility:
With support for DDR4 memory modules, the B660 ensures efficient multitasking and responsive performance. The dual-channel memory architecture enhances data transfer speeds, contributing to a smoother computing experience.
Storage Flexibility:
The barebone kit offers multiple storage options, including M.2 slots and SATA ports. This flexibility allows you to configure your storage setup based on your specific requirements, whether it’s for speed-intensive applications or large-capacity storage needs.
Graphics Capabilities:
Equipped with PCIe slots, the B660 provides room for dedicated graphics cards, enhancing the system’s visual capabilities. This is particularly beneficial for tasks such as video editing, graphic design, or even gaming within the homelab environment.
Compact Form Factor:
Designed with a Small Form Factor (SFF), the ASRock B660 is an ideal choice for those seeking a compact yet powerful solution. The space-saving design makes it suitable for various environments, including home offices and media centers.
Integrated Connectivity:
The B660 features integrated Wi-Fi and Bluetooth support, reducing the need for additional expansion cards. This ensures seamless connectivity for networking and peripherals, contributing to a clutter-free and efficient setup.
Robust Build Quality:
ASRock is renowned for its build quality, and the B660 is no exception. The kit is crafted with durability in mind, providing a stable foundation for your homelab endeavors.
User-Friendly BIOS:
ASRock’s user-friendly BIOS interface simplifies system configuration and tweaking. Whether you’re a seasoned enthusiast or a beginner, the intuitive BIOS ensures easy navigation and customization.
Expansion Slots:
The B660 is equipped with PCIe slots for additional expansion cards, allowing users to tailor the system to their unique requirements. This versatility ensures future upgradability as your homelab evolves.
Audio Enhancement:
Featuring high-quality audio components, the ASRock B660 delivers an immersive audio experience. This is particularly beneficial for users engaging in content creation or those who appreciate high-fidelity sound.
In conclusion, the ASRock B660 Barebone Kit encapsulates a perfect synergy of cutting-edge features and user-friendly design. Whether you’re building a homelab for testing environments, virtualization, or local service hosting, the technical prowess of the B660 provides a solid foundation for your endeavors. Stay tuned for the upcoming chapters of my homelab-building journey as we explore the potential of this remarkable barebone kit!
Unveiling the Power Within – My ASRock B660 Build Specs
For the brain of the operation, I opted for the Intel i5-12600K processor, a powerhouse known for its exceptional performance. Its multi-core capabilities and high clock speeds make it a perfect fit for handling the diverse workloads anticipated in my homelab experiments.
To ensure the system operates with unparalleled responsiveness and efficiency, I didn’t hold back on the RAM. A whopping 128GB of RAM was chosen, providing ample room for multitasking, virtualization, and other memory-intensive tasks. This abundance of memory would be the cornerstone of a smooth and seamless computing experience.
In the storage department, a 6TB NVMe SSD takes center stage. With lightning-fast read and write speeds, this storage solution ensures quick access to data, a critical factor for my homelab’s performance. It’s not just about capacity; it’s about delivering the speed needed to keep up with the demands of my ambitious projects.
When it came to cooling the i5-12600K, I made a conscious decision to go against ASRock’s recommendation of a liquid-cooled CPU cooler. Instead, I opted for a 45mm low profile CPU fan by ID Cooling. This choice was driven by a desire to explore and test the system’s thermal performance under real-world conditions. The ID Cooling fan, with its efficient heat dissipation design, promised to keep temperatures in check without the complexities of liquid cooling.
The rationale behind my component selection was simple – to create a homelab setup that doesn’t just look good on paper but stands resilient in the face of practical challenges. Building a homelab isn’t just about assembling components; it’s about putting the system through its paces, pushing it to its limits, and ensuring it can handle the demands of real-world workloads.

Design
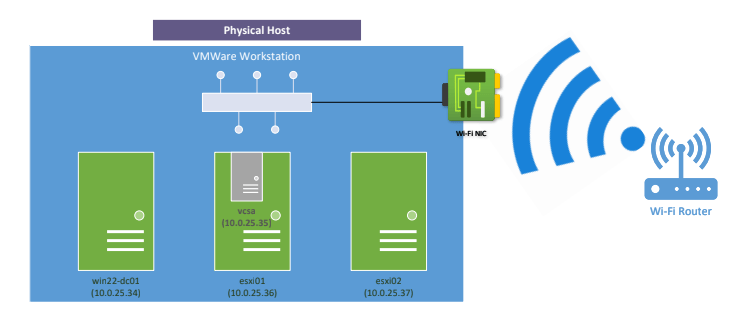
Machine List

Configuration
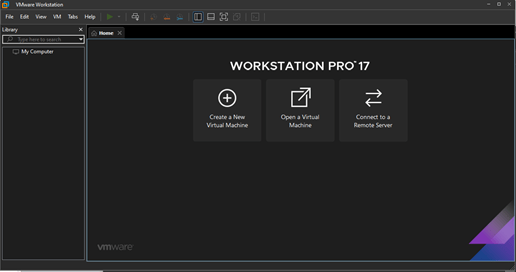
Let’s create our first VM.
Click on ‘Create a New Virtual Machine’.
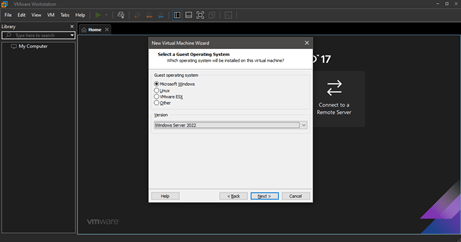
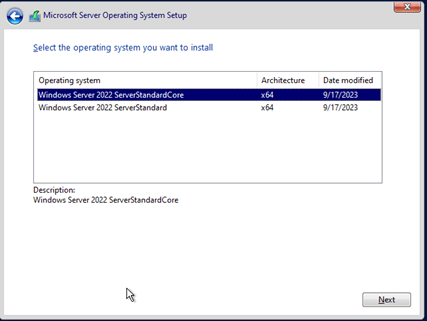
Select MSFT Windows and select ‘Windows Server 2022’ for version since I will be using Windows 2022 ISO here.
Let’s name the VM – win22-dc01.

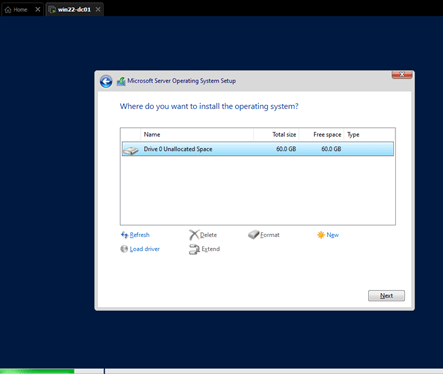
Maximum 60GB should be fine. Let’s select ‘Store virtual disk as a single file’ and click Next.

This will take us to the summary page showing all our choices for this particular VM.
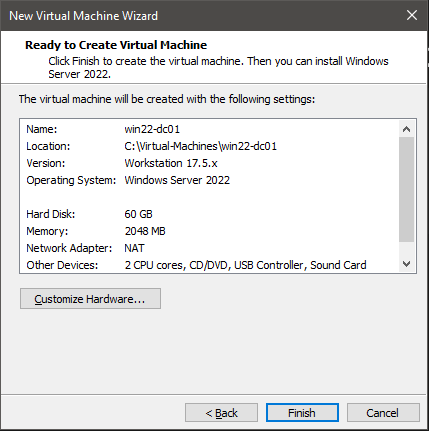
Click Finish.
We should be able to see the VM in our Workstation console.
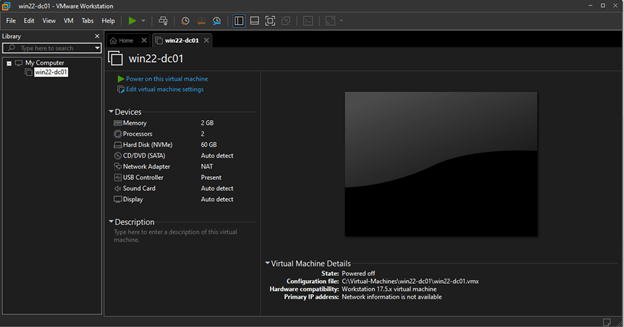
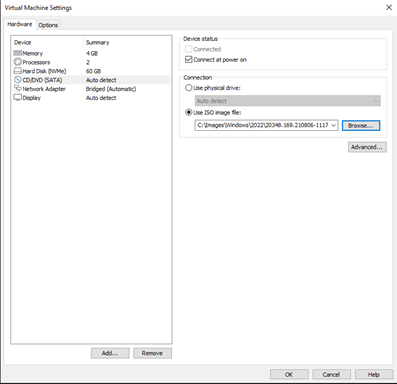
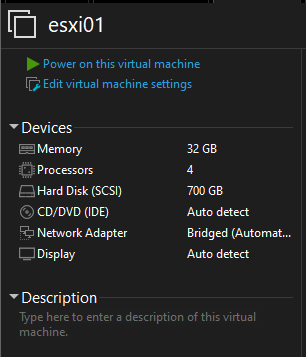
Let’s edit the VM settings per our spec sheet above.
We are in business!

Select ‘Windows Server 2022 ServerStandard’.
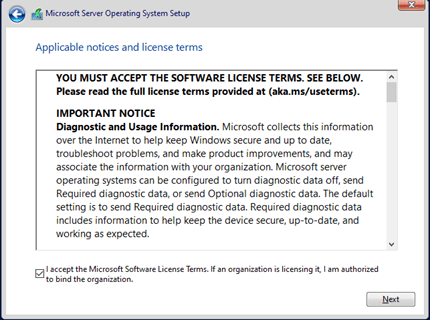
Accept EULA and hit ‘Next’.
Select ‘Custom’ installation
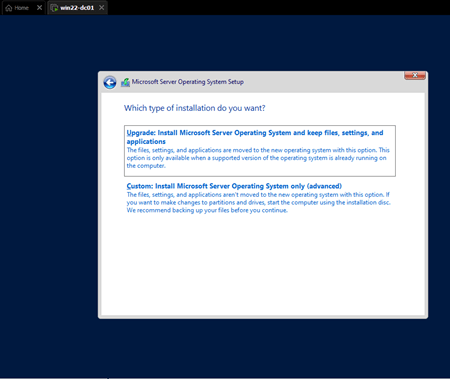
Hit ‘Next’.
Installation has started.
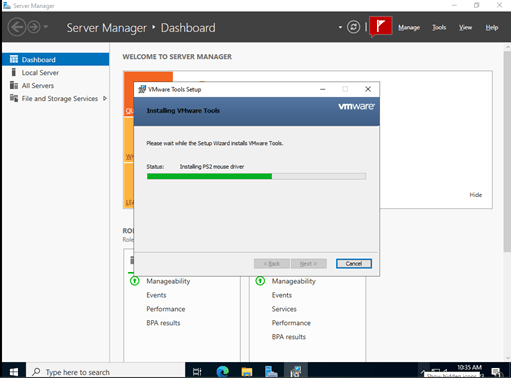
You might see a banner at the bottom of this status window asking to install VMWare Tools.

This tool-kit is a set of services and modules which help administrators to better manage guest OS and seamless user interactions with them.
We will install them as soon as we login to the VM.
It asks to set a secure password for ‘Administrator’ account.

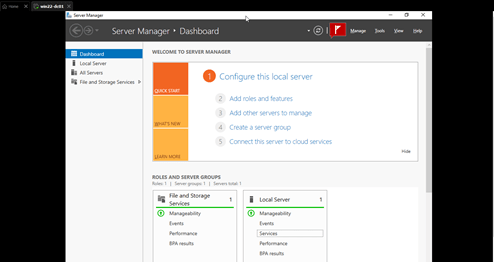
Once logged in, we can see that the server manager landing page.
Let’s install VMWare Tools now.

I am selecting ‘Typical’ installation.
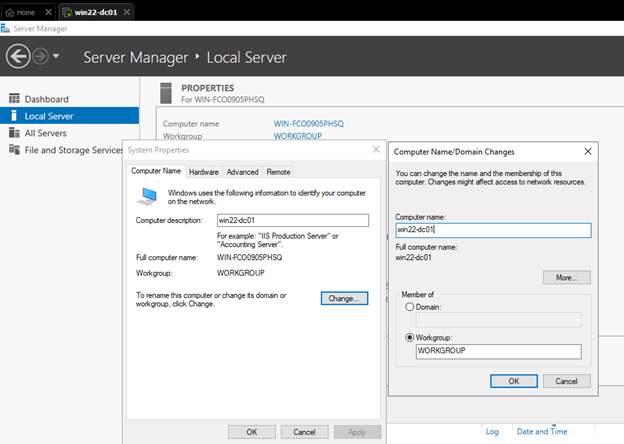
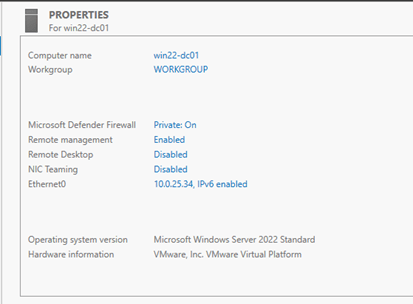
Once VMWare tools is installed, we need to change the name of this VM to match our nomenclature before promoting this machine to a domain-controller.
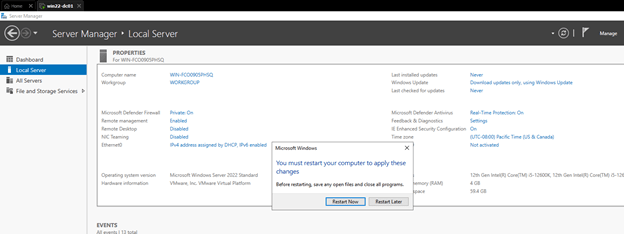
The VM need to be restarted for the changes to take effect.
Let’s set the machine’s static IP Address.
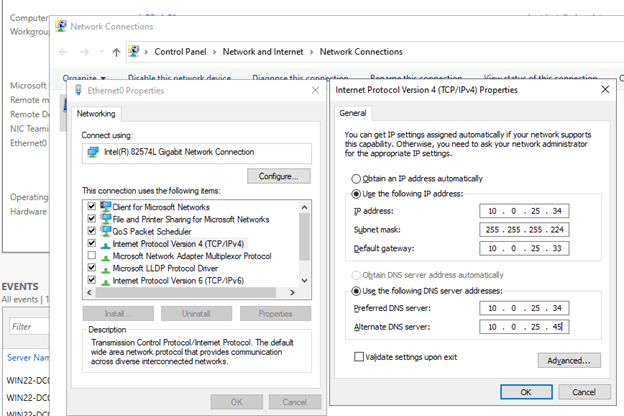
As you can see, I am assigning ‘Primary DNS Server’ as localhost and the secondary as my network proxy server.
The IP Address is showing as desired now.
Now, let’s create two more VMs by following the same process that we followed for this win22-dc01 VM. The only difference will be that these two will now be VMWare ESX VMs.

And, its booting.

Let’s set a secure ‘Root’ password.

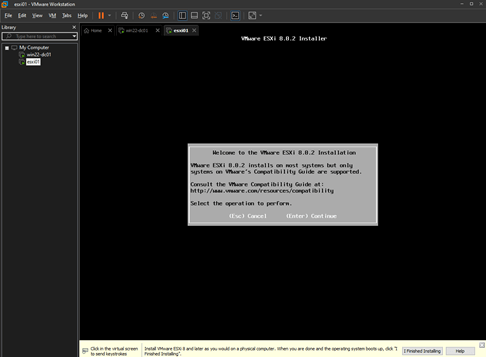
Press F11.
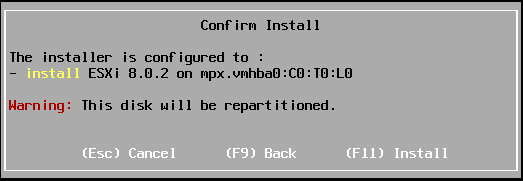
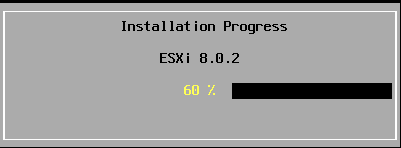
This should trigger the ESXi installation process.
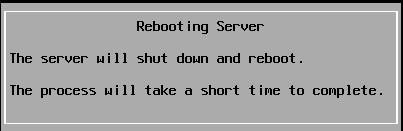
Post installation, it will reboot the host (VM, in our case).
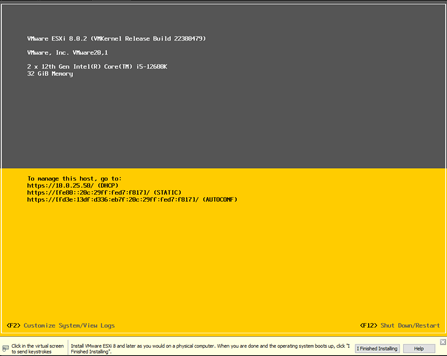
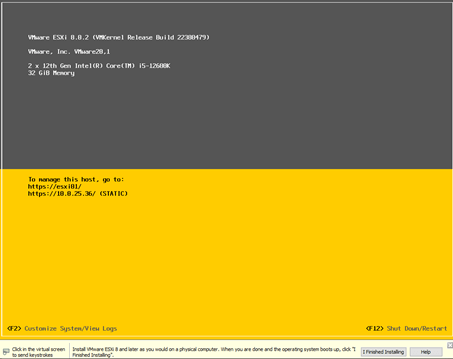
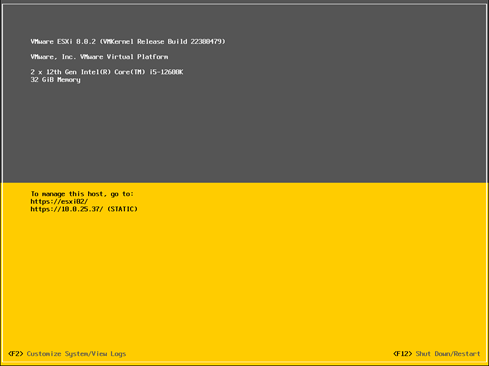
Once rebooted, we should be able to see the ESXi landing page.
Let’s change the settings for both the ESXi hosts to match our sheet.
Let’s prep our Win2022 machine first to be able to serve as domain controller.
Let’s add DC DNS role to the Win2022 machine.

This will fire up the ‘Add Roles and Features’ wizard.
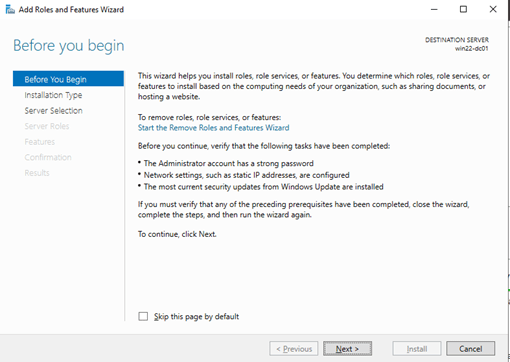
Click Next
Select ‘Role-based or feature-based installation’ and hit Next.

Verify the name and IP of the target machine (Win2022 machine in our case) and hit Next.

Click on ‘Active Directory Domain Services’.
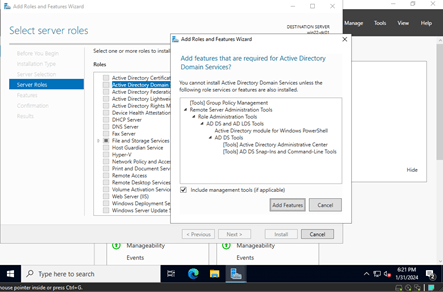
Keep the features as default and hit Next.
Keep AD DS as default and hit Next.
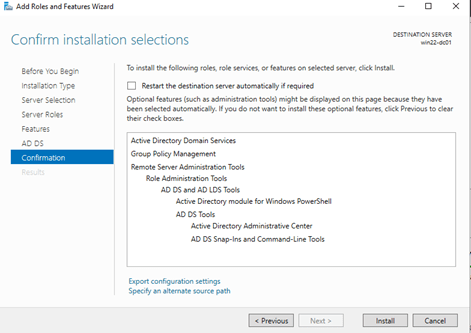
Hit ‘Install’ at the confirmation page.
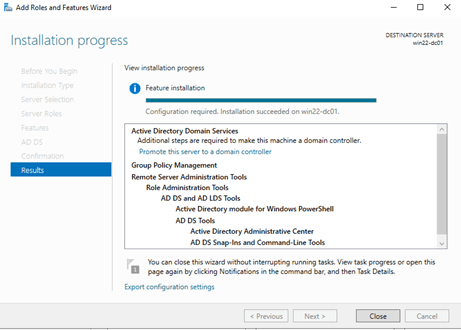
This will fire-off the installation process.

Once installation is completed, it will ask us to promote this machine to a domain-controller. Click on ‘Promote this server to a domain controller’.
Since, this is going to be the 1st DC in a new forest, we will select ‘Add a new forest’ and enter our root domain name and hit Next.

Enter the DSRM password and hit Next.

Let’s fill in our NetBIOS name (MINERVA in our case) and hit Next.

This step shows the various paths where all date related to DB, logs and SysVOL will be stored. No need to change anything here.
Hit Next.
This next step shows the summary of all the choices that we have selected through this wizard.

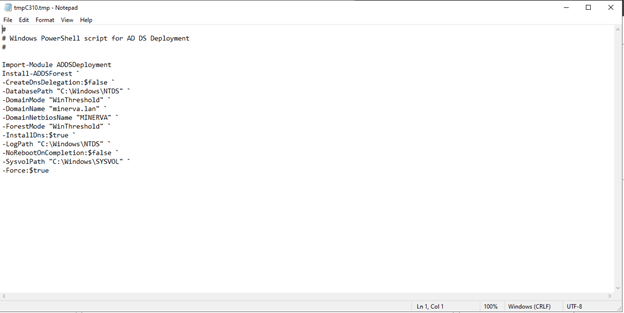
We can click on ‘View script’ which will show all the configuration in a PowerShell scripted format. This can be saved for future additional DC installation and promotion, if required.
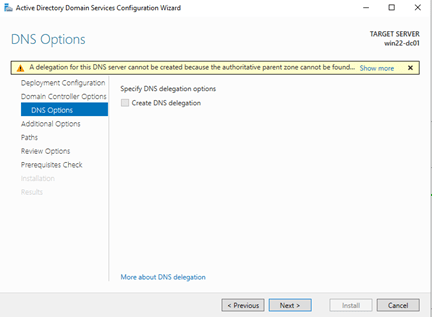
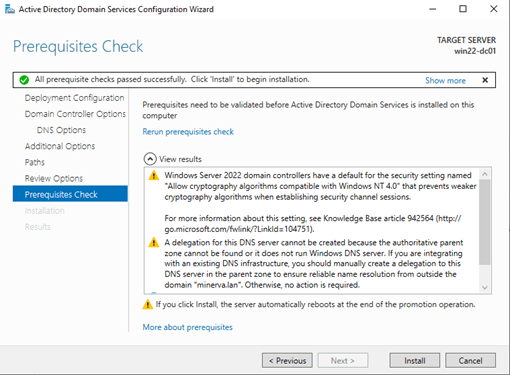
Hit Next. This will kick-off the validation checks.
Once all the validation checks are verified, it will ask us to trigger the installation process. We can now hit Install.

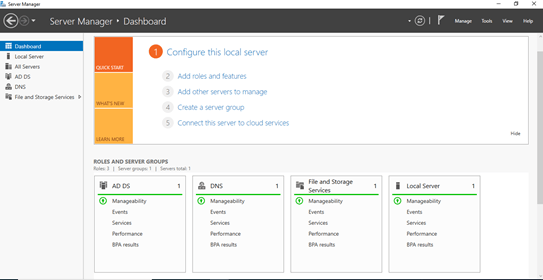
Post reboot, we should be able see AD and DNS roles added to the server.
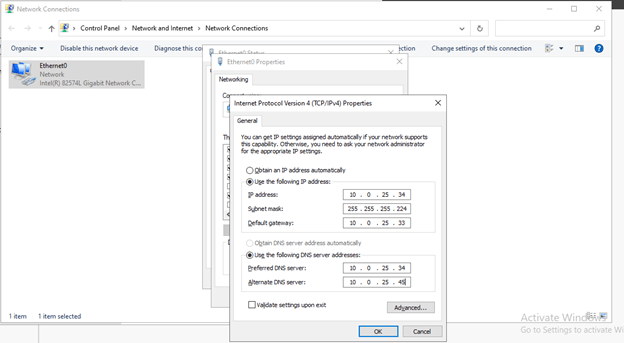
Let’s set the IPv4 settings for this machine for DNS.
I am setting my Primary DNS to the this machine’s IP as this machine is going to be the DNS for the domain ‘minerva.lan’.
For secondary DNS, I am setting it to my Pi-Hole IP Address. You can set it to either the default gateway of the subnet or any of the public DNS IP Addresses.
Since, we have already set the appropriate settings for the ESXi VM, let’s prep the AD server.
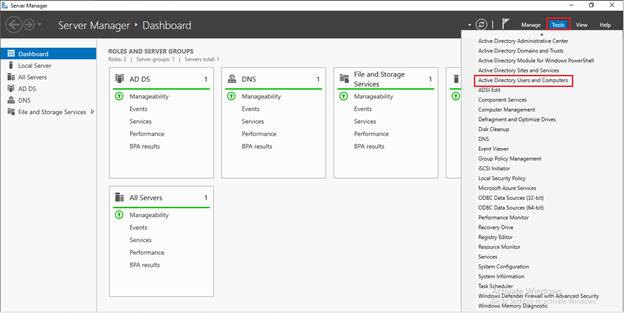
Click on ‘Tools’ and the ‘Active Directory Users and Computers’.
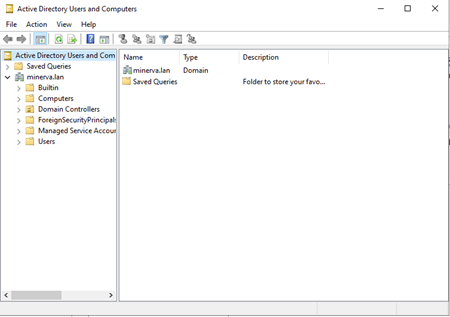
Let’s create a few OUs to organize the various types of AD accounts.
I am going to create a base OU called ‘minerva.lan’
Right-click on ‘minerva.lan’ then click ‘New’ and then ‘Organizational Unit’

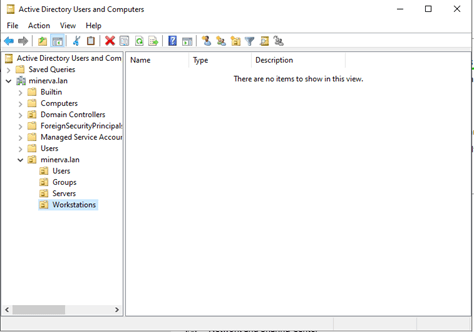
Now that we have a base OU created, let’s create some additional OU types to better organize the AD types under it.
I will be following the same process to create additional OUs. The only difference is that these will be created under the newly-created OU ‘minerva.lan’.
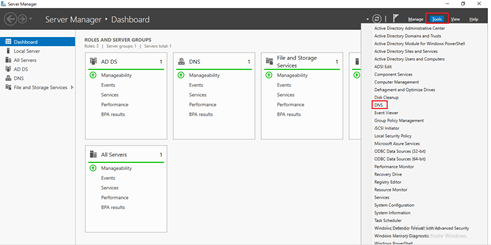
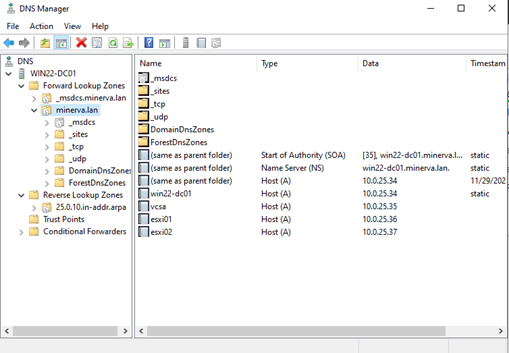
Let’s move on to DNS for a bit and prep the DNS side as well.
Click on ‘Tools’ and then ‘DNS’.
As you can see, our DNS and Forward Lookup Zone is appropriately created. A forward lookup zone typically converts a name to an IP address. This zone contains all the records of domain names to their IP addresses.

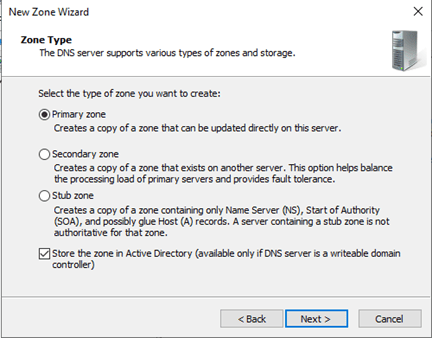
However, the ‘Reverse Lookup Zone’ is not created yet. This is equally important. Reverse lookup zones are used to verify that the IP address the source host is using is actually coming from the location where that IP address name is authoritative.
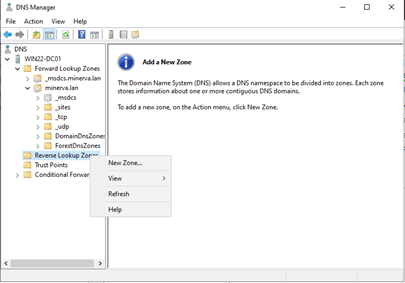
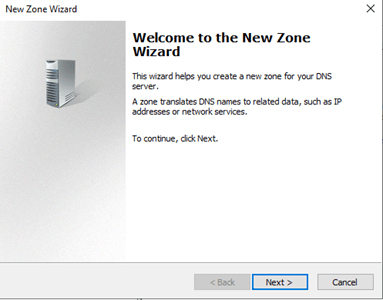
This will start off a wizard. Hit ‘Next’.
Since this machine is the DNS server for the forest, let’s click on ‘Primary zone’ and hit ‘Next’.
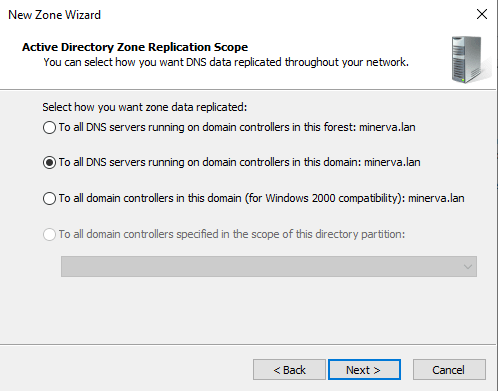
Select ‘All DNS Servers running on domain controllers in the domain: Minerva.lan’
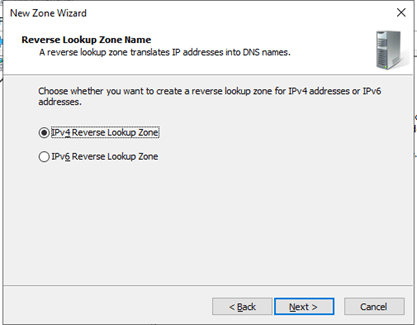
This is going to be an IPv4 lookup. Let’s select that and hit ‘Next’.
Let’s fill in the network ID. Ours will be 10.0.25. and hit ‘Next’.
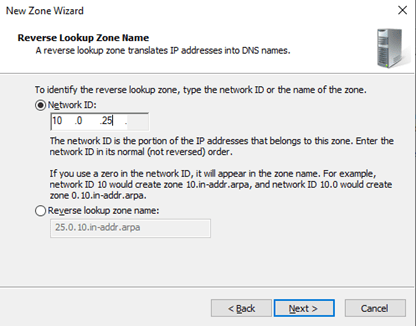
Hit ‘Next’ in the next prompt.

Then hit ‘Finish’

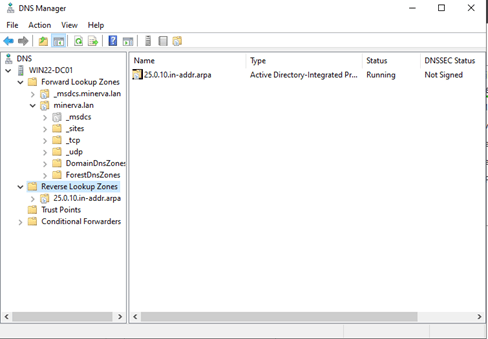
Our Reverse Lookup Zone is now created.
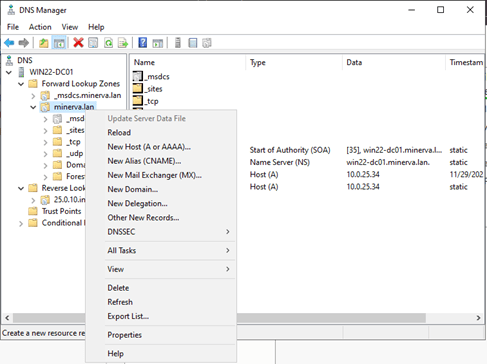
Let’s create some A-records the servers in our environment – VCSA, ESXi01, ESXi02, win22-dc01.
Right-click on ‘minerva.lan’ and select ‘New Host’
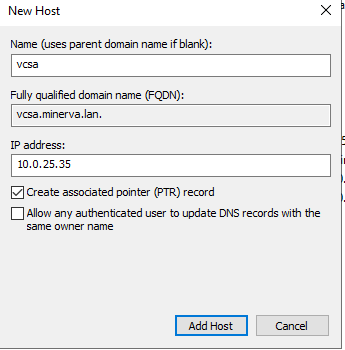
Check the ‘Create associated PTR record’ and click on ‘Add Host’.
Follow the same process to enter the other hosts as well.
If you remember, we have already set our hosts with static IPs and hostnames. So, let’s verify if our resolutions are working or not.

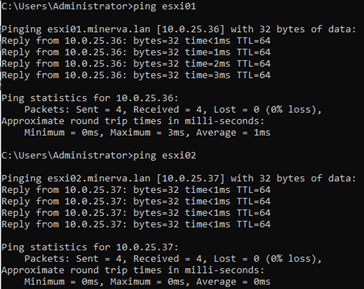
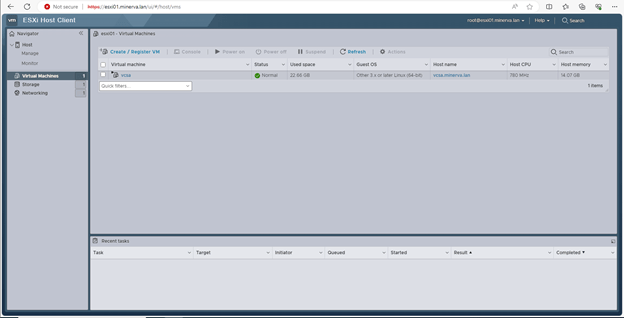
Let’s try to open the GUI of the hosts by browsing to https://esxi01.minerva.lan & https://esxi02.minerva.lan
Woohoo, we are in business!!!

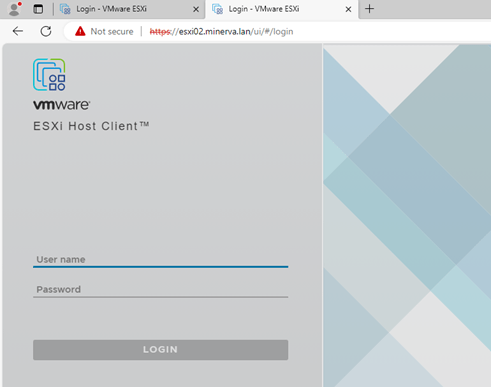
Let’s login to both of them using the root credentials.

If you remember, I have assigned 700GB HDD space to each of these two hosts.
Let’s verify if we can see the datastores.
Yes, we can.

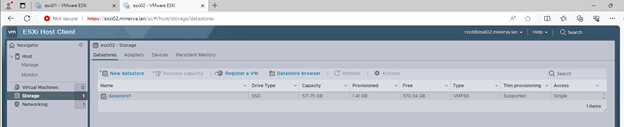
You might be wondering ‘why 571.75GB in place of 700GB?’
Well, there is a reason for this behavior….
If ESXi installer find a disk attached to the host which is larger than ~130GB, it creates the required partitions and increase the OS_DATA(VMFSL) up to 128. The rest of the space is created automatically as a (VMFS6) Datastore1 to place VMs on. It is up to the Admin to create now external Storage as SAN/NAS or by attaching other local disks.
Now, let’s configure the vCenter server. The vCenter server will be installed in one of the ESXi hosts and will be used to manage both hosts and its guest VMs.
I have the VCSA installer in my local machine. Let’s copy it to the win22-dc01 machine so that we can initiate the installation process.
Now, that our hosts are created successfully, let’s fire up the VCSA installation on one of the ESXi hosts.
Double-click on the VCSA ISO file and this will virtually mount the media to the D: (CD/DVD Drive).

Click on ‘vcsa-ui-installer’ then win32 and double-click on the file ‘installer’

This will fire-up the VCSA installer wizard.
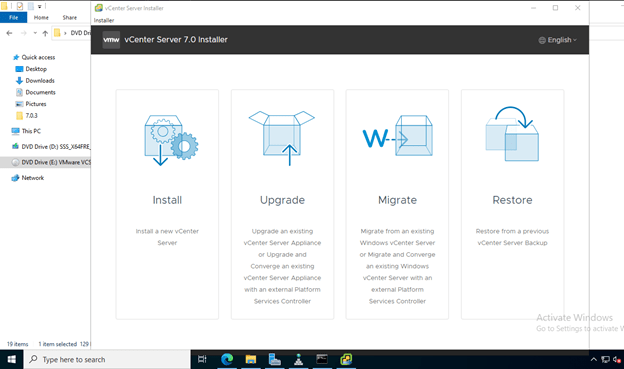
Since this is going to be a new vCenter server, let’s click on ‘Install’.
Click ‘Next’.
Accept the EULA and hit ‘Next’.

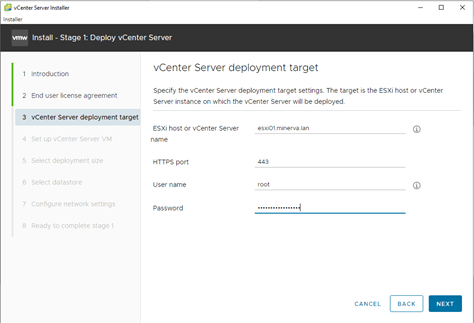
Since we will install this VCSA appliance in ESXi01, let’s enter the FQDN and root password for the host and hit ‘Next’.
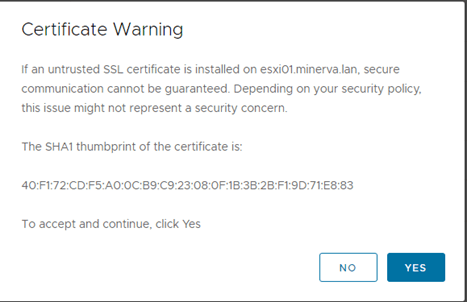
It will present the certificate warning.
Let’s enter the preferred VCSA appliance name, set a strong root password for the appliance and hit ‘Next’.

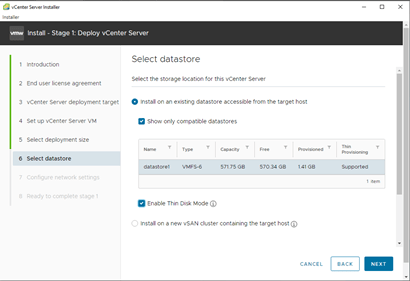
Since this is a lab setup, we should be fine with a ‘Tiny’ build size and ‘Default’ storage. We can hit Next.

These are the options you need to configure for the ESXi host to provision the VM. Here, you configure the target datastore where the vCenter appliance will be deployed.
Select the needed datastore that contains enough free storage space. You can Enable Thin Disk Mode to use thin provisioned virtual disks for the VCSA VM to save storage space.
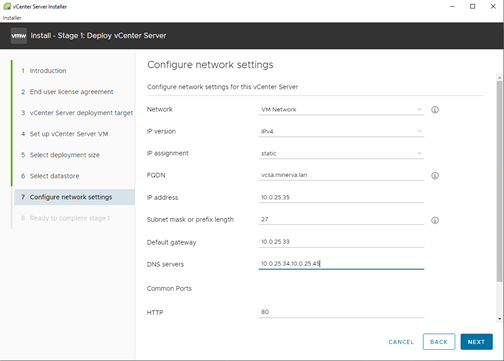
Let’s provide the other details for the VCSA appliance and hit Next.
This will present with a summary page with all the settings that we have inputted so far. If all looks good, we can hit Finish.
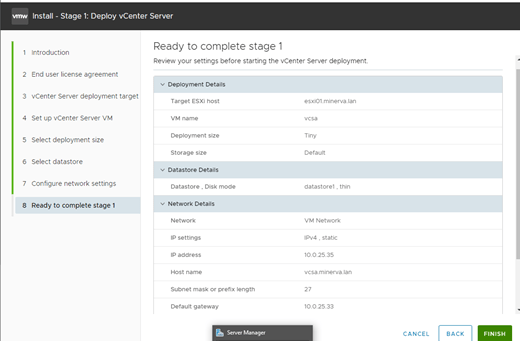
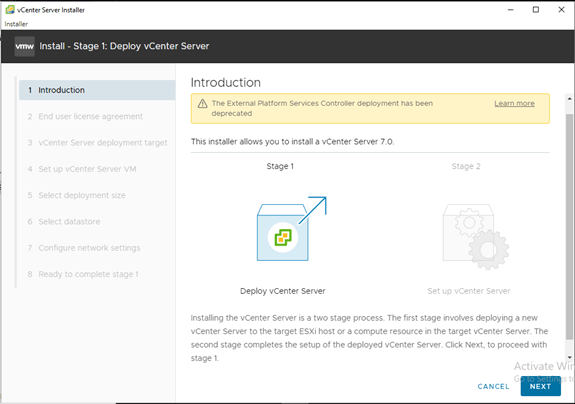
This will kick-off the Stage 1 deployment process of the VCSA appliance.

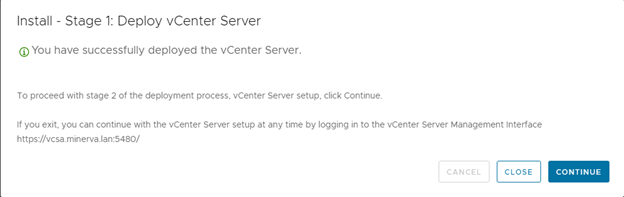
Once Stage 1 deployment is completed, it will ask us to continue to Stage 2. Let’s click Continue.
Voila! Stage 2 deployment is ready to be kicked-off. Let’s click Next.

You can either choose to sync time with the ESXi host, public NTP Servers or not sync time at all. Time synchronization is always a good idea and trust me, it will save a lot of heartburn later.
I am choosing two public NTP servers.
Also, it is always a good idea to enable SSH access to the VCSA. Let’s click Next.

Let’s enter an SSO domain and secure SSO password.

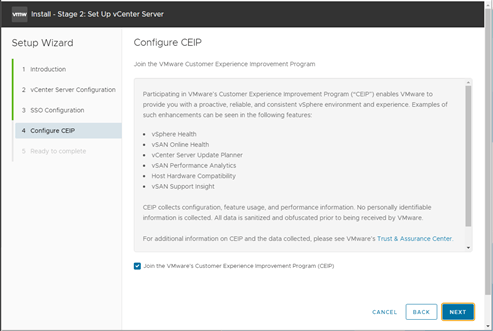
I am opting out of CEIP.
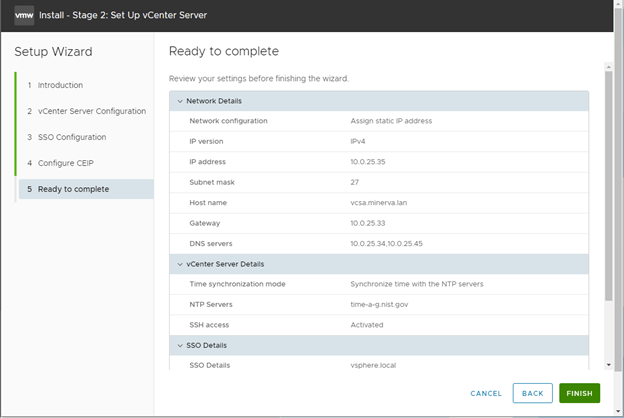
Once all parameters are verified, we can hit Finish.
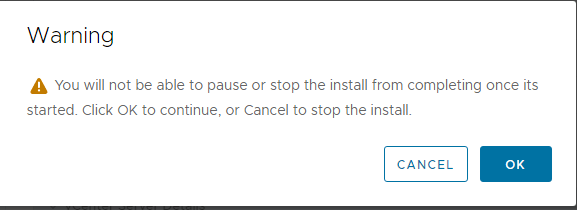
You will be presented with the caution that this process cannot be stopped in the middle.
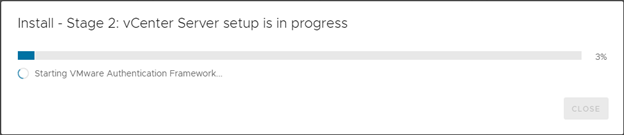
This will trigger the Stage 2 deployment.
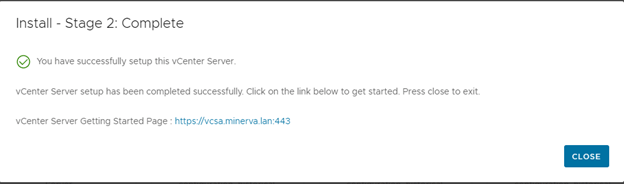
And we are able to get to the GUI!
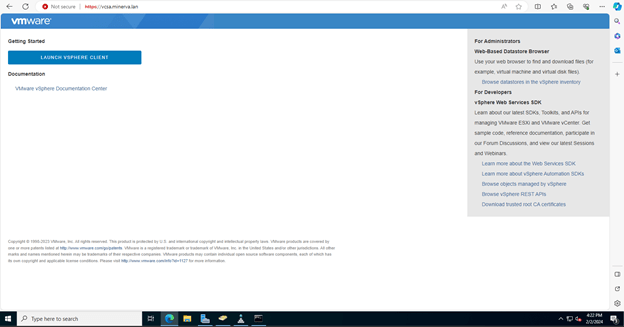
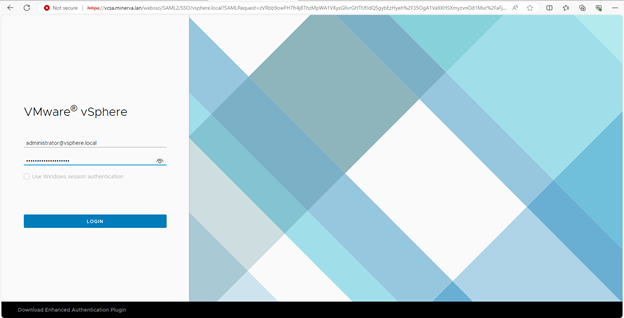
Let’s launch the client and enter our SSO credentials.
And we are able to get to the home/landing page using the FQDN as well.
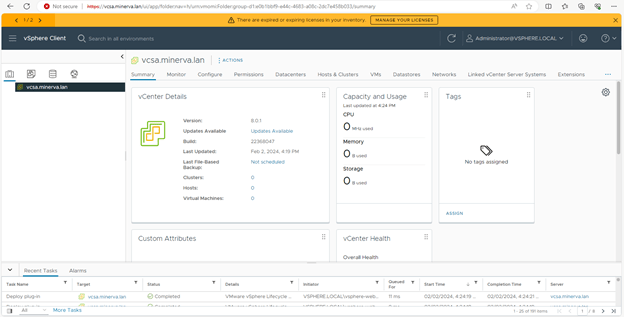
We can also see the VCSA appliance inside our ESXi01 host.
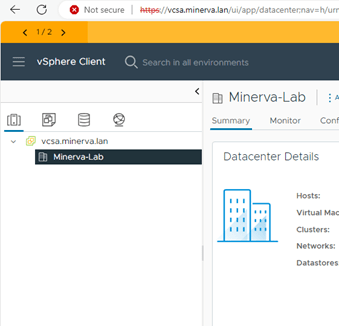
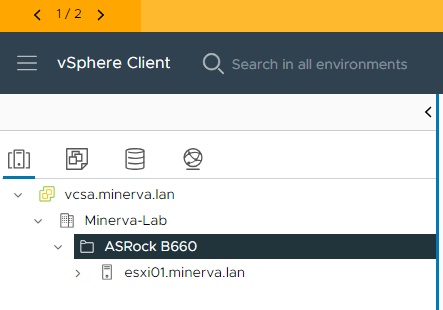
Let’s create a new datacenter called Minerva-Lab and a sub-folder under it called ‘ASRock B660’. The idea is to have this organized into different sites.
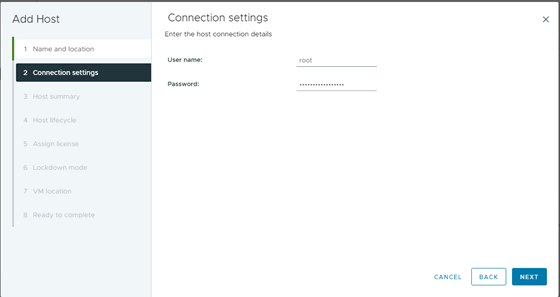
Now, let’s add out hosts to our site ‘ASRock B660’ by clicking on ‘Add Host’

This will take us through the step-by-step process of adding a host to the site.

Let’s enter the ESXi credentials.

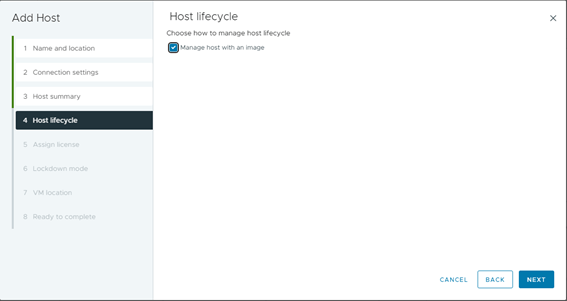
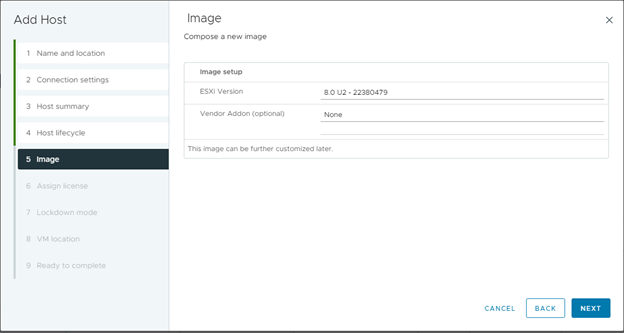
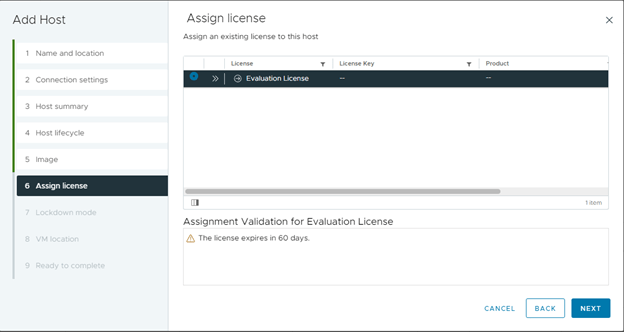
We are fine using an ‘Evaluation’ license as this is a lab setup. Let’s hit Next.

Let’s hit Finish.

Our first ESXi host is now added.
Let’s follow the same process to add the other ESXi host as well.
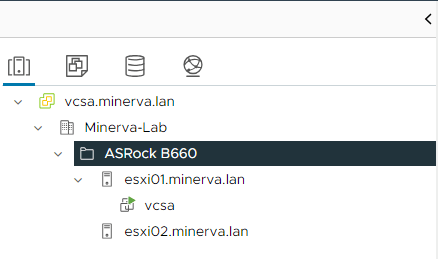
As you can see, my homelab has seamlessly transitioned from an idea to a fully functional reality.
Now that I am done with the base build, let’s look at the load on the system.

Not bad at all.
As I proudly announce that my homelab is now ready for primetime, the journey doesn’t end; it evolves. It’s an invitation to explore, experiment, and push the boundaries of what’s possible in the realm of technology. Join me as I navigate the exciting chapters that unfold within the dynamic ecosystem of my homelab, where innovation takes center stage!
Please keep following my future blog posts to know about my journey into this newly built homelab.
Thanks for your support!

Leave a comment